Advanced Custom Fields (ACF), Plugins, WordPress
Advanced Custom Fields Tutorial: Ultimate Guide for Beginners

Dec
WordPress custom fields are like secret weapons that make WordPress much more versatile than just a blogging tool. Presented here is a systematic guide to Advanced Custom Fields for beginners, offering a step-by-step approach.
One really useful tool for handling these custom fields is the Advanced Custom Fields plugin. It’s well-known because it makes dealing with custom fields a breeze. Now, let’s break down why it’s so handy and walk through how you can use it on your WordPress site.
Ready? Let’s go!
What Do WordPress Custom Fields Entail and How Can They Expand Your Capabilities?
Sure thing! Custom fields in WordPress are like little pockets where you can keep extra info about your content. It’s like having a secret drawer for essential details.
Think of it as metadata storage – the techy term for it. Even if that sounds complex, it makes your favourite plugins and themes work smoothly.
Take WooCommerce, the go-to for creating online shops. It uses custom fields to stash details like the price, weight, and colour of a product.
Imagine you have a calendar plugin for events. It uses custom fields to keep info like where the event is, when it starts/ends, and how much it costs.
Now, here’s the cool part: you can make your own custom fields to save info that matters to you. That’s what we’re diving into in this post! Ready to make your WordPress site even cooler? Let’s do it!
In What Scenarios Would Custom Fields Be Appropriate?
You might be wondering why bother with custom fields when you could just type everything in the regular text box on your WordPress site, right?
Well, using custom fields is like taking the smarter route, and here’s why:
- Easier Input: Instead of typing everything out, custom fields offer neat boxes. Let’s say you need to add a date; you can just pick it from a calendar instead of typing it all.
- Consistency: Your info will always look the same across your whole site. No surprises! It’s like having a reliable template.
- Easy Updates: If you want to change how things look later, you can do it all in one go. No need to edit each post separately – saves you time and effort.
So, custom fields make things smoother and more consistent. Handy, right? Let’s keep going!
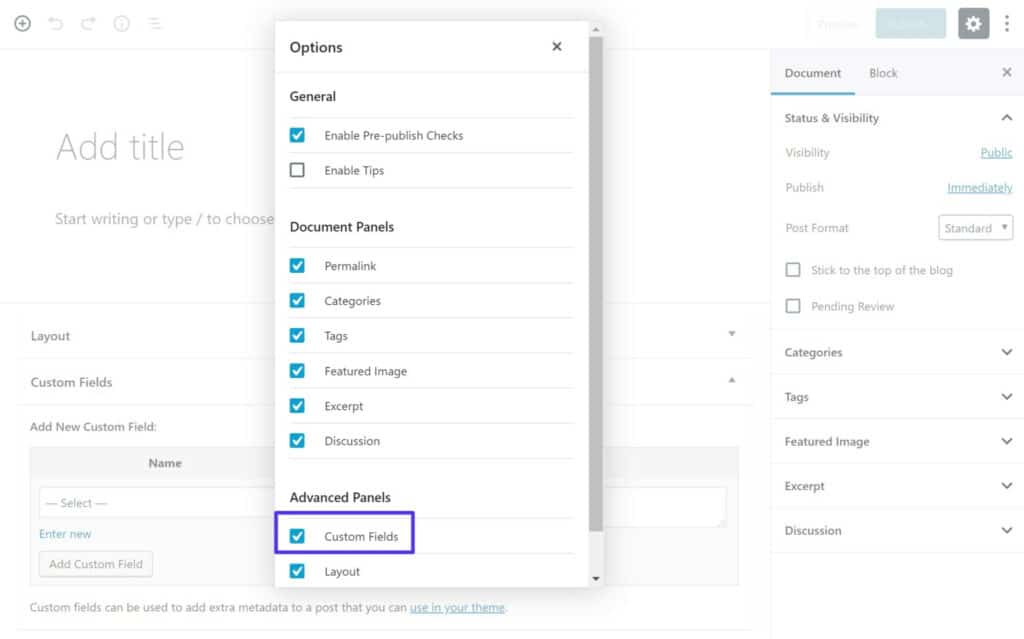
WordPress Comes Equipped with Inherent Custom field capability
WordPress already has a built-in way to add custom fields to your content. If you’re using the classic TinyMCE editor, you can turn this on in the Screen Options. If you’re using the new block editor, look for it in the Options area.
It’s like a hidden feature that’s there when you need it. Ready to explore more? Let’s go!
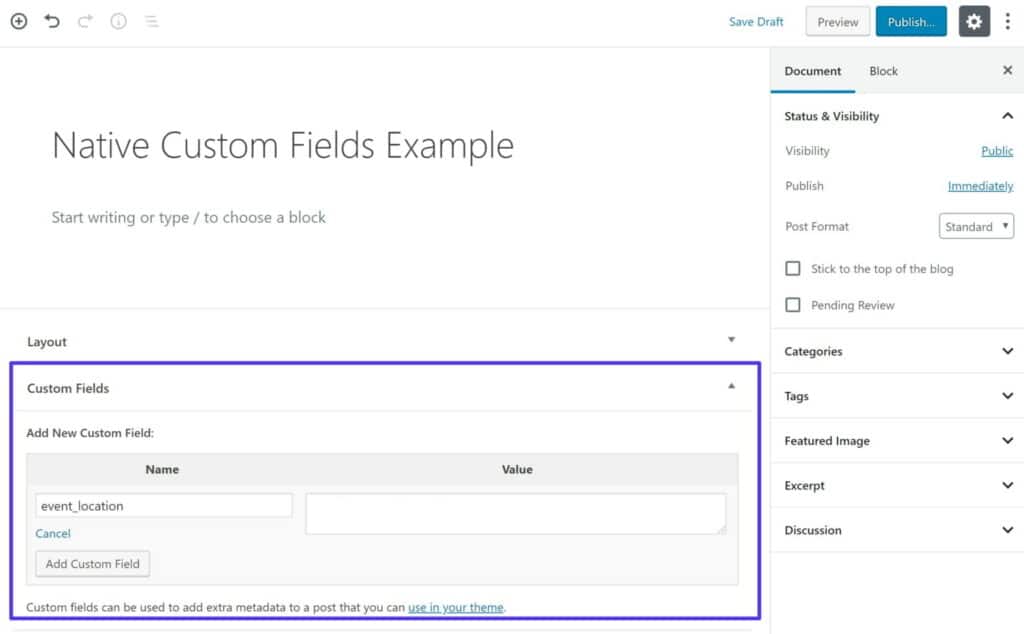
After turning on custom fields, you get to add your own info using key/value pairs:
It’s like filling in blanks – you have a key (what kind of info it is) and a value (the actual info). Simple, right? Ready for the next step? Let’s keep it rolling!
The regular custom fields in WordPress work fine, but they’re not the easiest for everyone. That’s why many folks prefer using the Advanced Custom Fields plugin instead.
It’s like upgrading to a friendlier version – makes things simpler. Ready to make your life easier? Let’s dive into the Advanced Custom Fields plugin!
Advanced Custom Fields Simplifies the Process Significantly
In simple terms, Advanced Custom Fields makes dealing with custom fields in WordPress way easier – pretty much in every way.
It makes the dashboard (the place where you manage your site) simpler for adding and handling custom fields. Plus, it makes showing custom field info on your actual website much easier too. No wonder it’s rocking a 4.9-star rating from over a million users!
On the behind-the-scenes part (the technical stuff), it lets you create easy-to-use boxes with different types of fields. So, instead of the plain key-value style, you can use cool things like date pickers and checkboxes. It’s like custom fields on steroids! Excited to try it out? Let’s keep going!

Advanced Custom Fields gives you over 30 types of fields that you can use in different parts of your dashboard – like in posts, user profiles, categories, and more.
Not only that, but it makes showing this info on your site a breeze. It has clear instructions on how to do it, whether you’re using functions, shortcodes, Gutenberg blocks, or other tools like drag-and-drop page builders.
It’s like having a big box of tools to make your website look and work just how you want it to. Excited to explore more? Let’s keep going!
Choosing Between Advanced Custom Fields Free and Pro: Determining the Right Fit for Your Needs
You get two options with Advanced Custom Fields – a free one and a more robust paid version.
If you’re starting and need the basics, the free version is refined. It covers almost all the field types and features we discussed earlier, perfect for adding more info to your content.
Now, if you want to do some advanced things, the Pro version is worth considering. It comes with some extra helpful features:
- Repeater fields: Like a copy-paste for specific info. Great for handling things like events with multiple speakers.
- ACF blocks: It lets you show your fields as a block in the new Gutenberg editor. It is super handy for clients managing their sites.
- Flexible content field: Make layouts from other fields. Think of it like a simple page builder based on your custom info.
- Gallery field: Upload lots of images to one spot.
The Pro version also has other tweaks like options pages, cloning fields, and improvements to relationships between fields.
Click here for an Advanced Custom Fields (ACF) Pro License activation for only $249.00 $6.99 for a Lifetime.
A Guide to Implementing Advanced Custom Fields: Adding Your Customized Fields
Alright, let’s dive into the Advanced Custom Fields tutorial and learn how to make and show your own custom fields.
Imagine you have a blog all about running, and you want to share your daily workouts. For each blog post, you want to include details like the type of run (speed work or conditioning), how far you ran, when you started and finished, and where it all happened.
To do this, you’ll need five custom fields. Now, the cool thing is the steps we’ll go through apply to any situation. We’re just using running as an example to make it more relatable.
Here’s how we’ll do it:
- Adding and managing custom fields on the backend: We’ll set up those fields behind the scenes where you manage your site.
- Displaying custom field info on your site’s front end: We’ll make sure your readers can see all that running info you’re sharing.
Ready to get started? Let’s go!
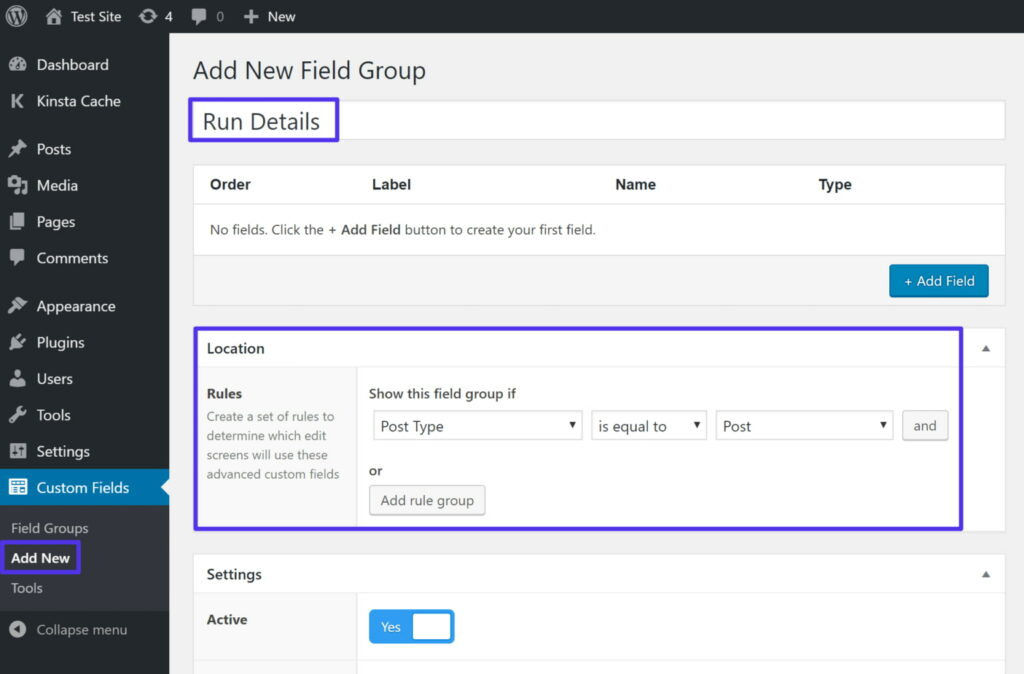
Generate a Fresh Field Group
Once you’ve added and turned on the free Advanced Custom Fields from WordPress.org, head to Custom Fields > Add New to make your first bunch of fields.
Think of this bunch as a team – it’s called a “Field Group.” It’s like a squad of custom fields that hang out together on your WordPress dashboard.
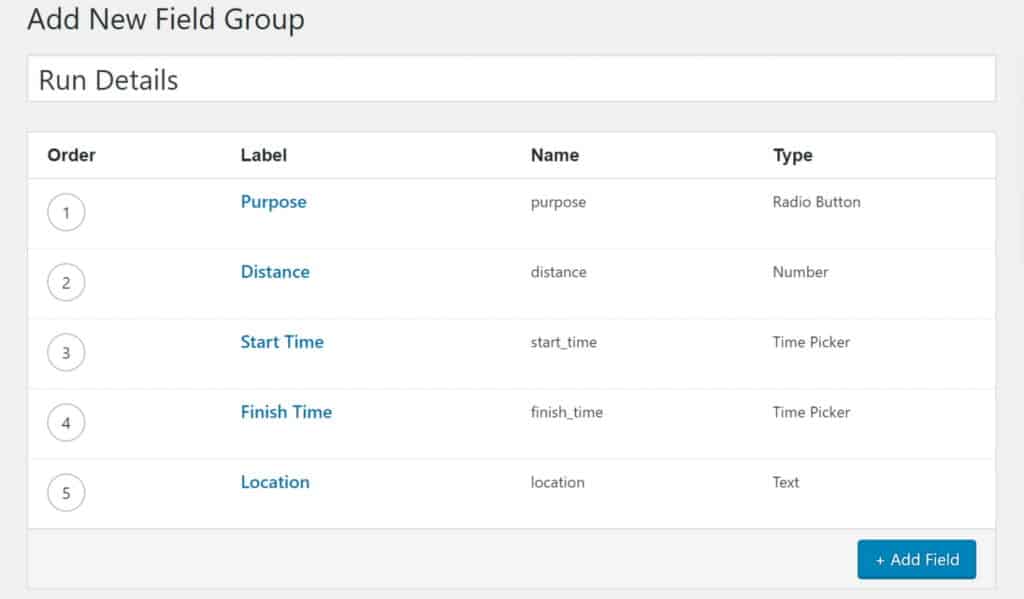
For our running blog example, you want one Field Group with five custom fields. So, give your group a name. Now, pick where these fields will show up. Since you want these fields for regular blog posts, keep it on the default setting, which is Post.
But, if you want these fields to pop up somewhere else, like on a special type of post or with a category, you can change that. You can even set up rules for your fields to show up in more than one place.
Simple enough, right? Ready for the next step? Let’s keep going!
2. Add Custom Fields
Now, tap on the + Add Field button to throw in your first custom field. It’s like adding a new member to your custom field team. Exciting, right? Let’s keep it rolling!

Now, a bunch of options will pop up, but you don’t have to fill in everything.
Just focus on two things:
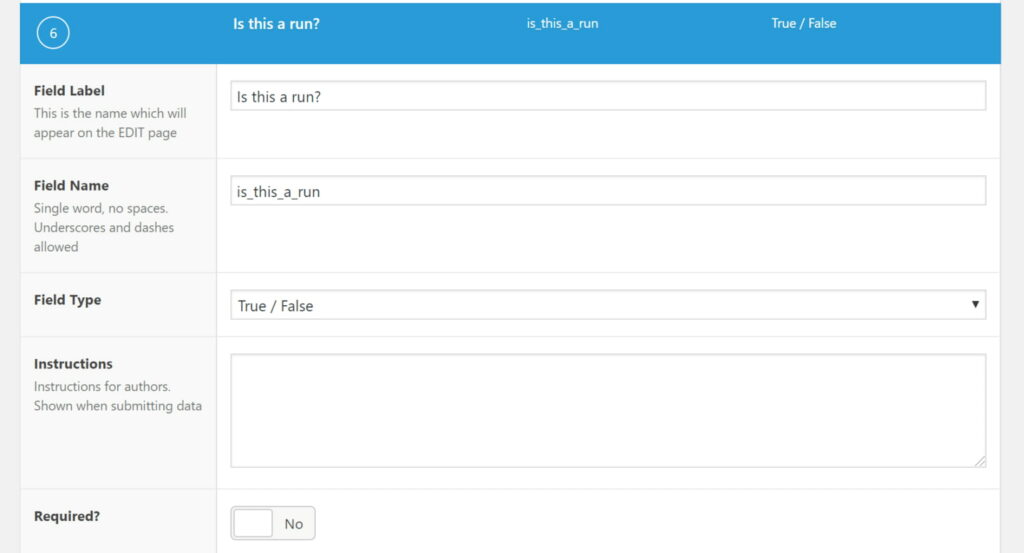
- Field Label: This is what you’ll see in the editor – it’s like the name tag for your field. It also makes the Field Name, which you’ll use in the code. You usually don’t need to change the field name unless you have a good reason.
- Field Type: This is the kind of info you want to collect. Like, do you want a Number field for numbers or an Email field for email addresses?
For our first field, go with the Radio Button field type. It’s like a mini survey for your running blog. Fun, right? Ready for the next step? Let’s keep going!

Scroll down a bit, and you’ll find a box where you can type in the options for your radio buttons – it’s called “Choices.”
It’s like making a little menu for your readers to pick from. So, let’s say for your running blog, the choices could be “Speed Work” and “Conditioning.” Easy, right? Ready for more? Let’s keep moving!

You can make a few more decisions if you want, like if the field must be filled out or if there’s a default value. Adjust these as you like.
Now, let’s try another example: a field to record how far your run was. For this, go for the Number field type.
It’s like setting up a little spot where you can punch in the distance of your run. Ready to tackle this one? Let’s keep going!
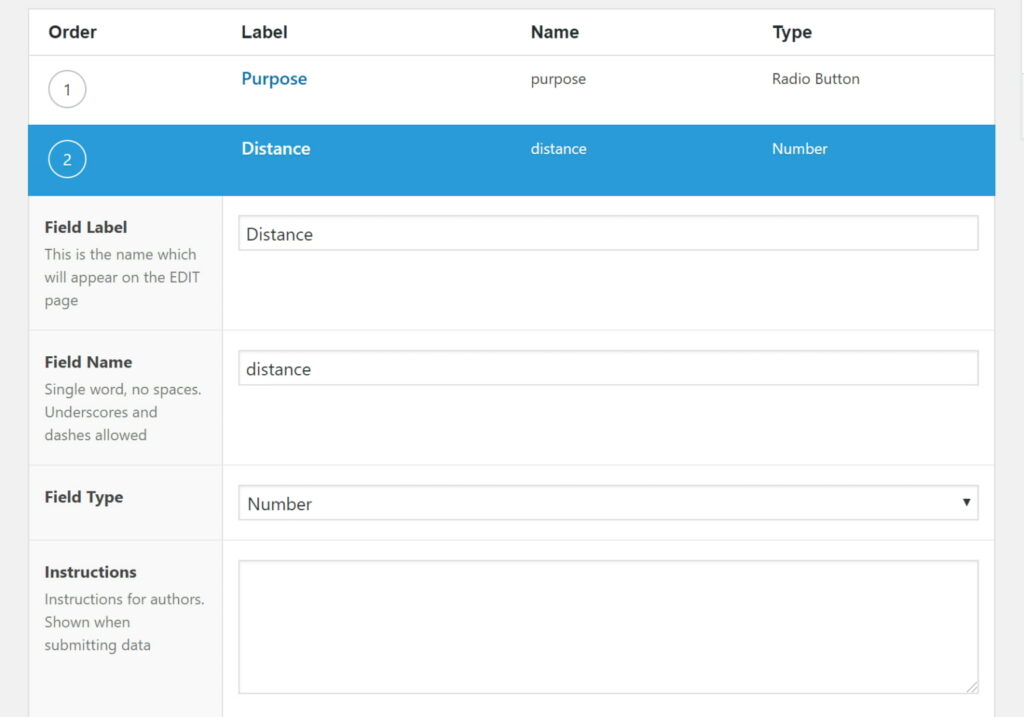
If you want to be friendly to your users, you can make it even easier. Choose to Append the distance unit so it’s clear if it’s miles or kilometers. And for a little extra caution, you can set up Minimum and Maximum Values. I mean, unless you’re running a thousand miles (and if you are, major kudos!), you might want to keep things realistic.
It’s like putting up guardrails to make sure the info makes sense. Fun, right? Ready for more? Let’s keep going!

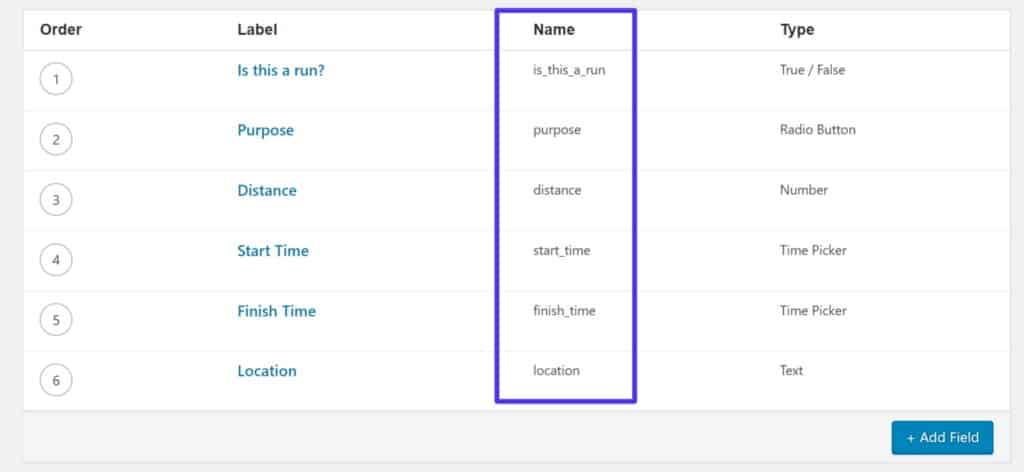
Keep doing the same thing for all the other info you want to gather. It’s like building a collection of little data spots. When you’re done, it’ll look a bit like this:
3. Adjust Settings and Make it Public
To wrap things up, scroll down to the Settings box. This is where you decide how your fields show up in the WordPress editor.
Usually, the default settings are just fine, but if you’re feeling fancy, you can switch things around. For instance, you could choose to show your custom fields above the usual WordPress editor.
It’s like arranging your blog tools exactly how you want them. Cool, right? Ready to see your hard work in action? Let’s move on to the next steps!
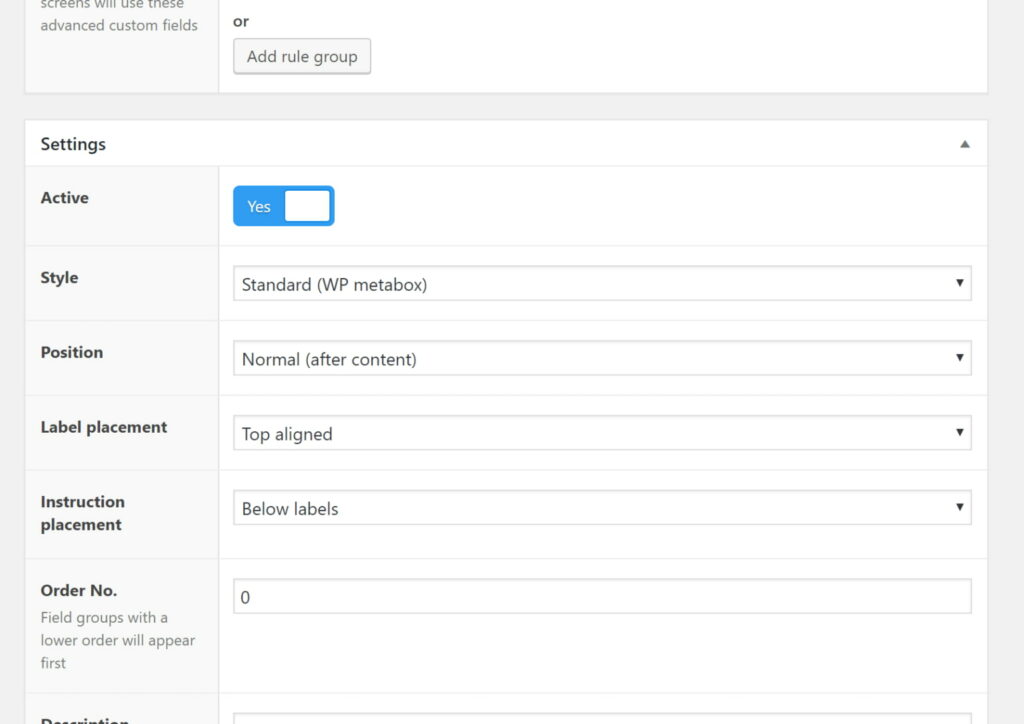
After you’ve made all your picks, hit the “Publish” button to make your group of fields live.
It’s like officially saying, “Okay, let’s go!” Exciting, right? Now, let’s see how it all looks on your site. Ready for the next step? Let’s go!
4. Include Content in the WordPress Editor
Once you’ve hit publish, your fields will show up when you’re making a new post.
By default, you’ll see them all together right under the editor. It doesn’t matter if you’re using the classic editor or the new block editor – your fields will be there, ready to use.
It’s like having your special tools neatly arranged and ready to go. Exciting, right? Ready for the last part? Let’s keep going!
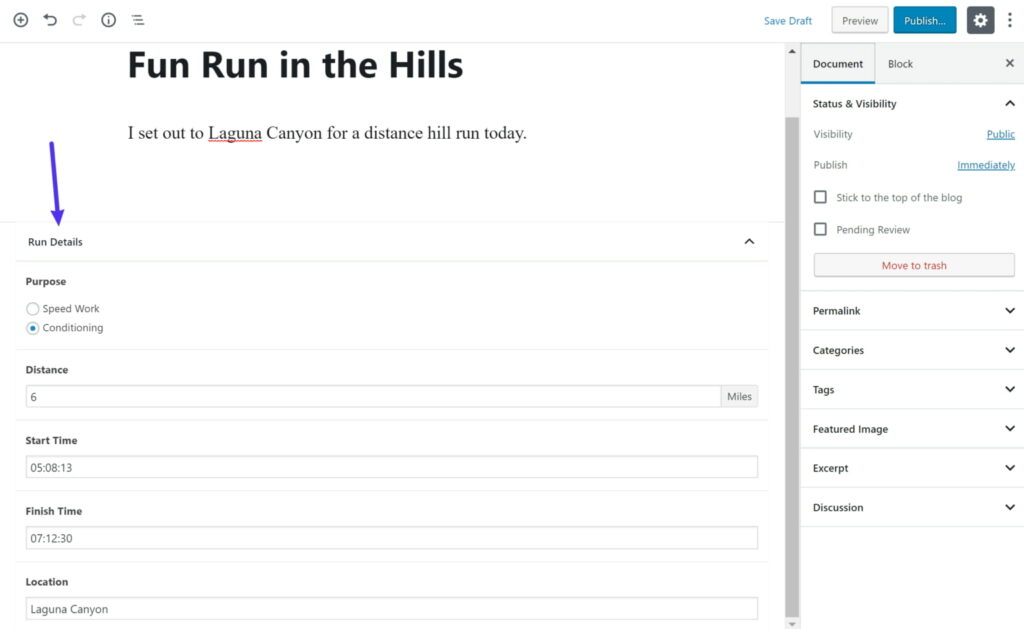
The details you type in here will be saved in your WordPress site’s database. It’s like putting them in a safe place so you can easily get them back whenever you need.
Exciting, right? Ready to see how to show off all this cool info on your actual site? Let’s dive into the next steps!
5. Navigating Through Conditional Logic
Before we keep going, let’s take a little side trip.
You see, one big reason people love Advanced Custom Fields is because it lets you do some really cool stuff.
One nifty feature is Conditional Logic. This lets you decide when to show or hide fields based on how you answered a previous question.
Let’s break it down with a quick example:
Imagine you want to blog about food, your travels, or something other than running. Now, if you’re writing about, let’s say, your favorite recipe, it doesn’t make sense to show the custom fields about your daily run, right?
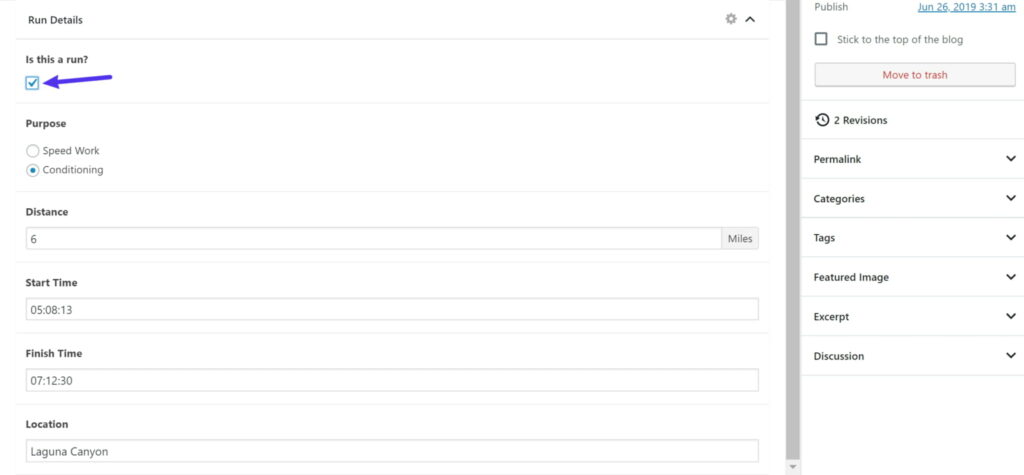
So, instead of just displaying all those running fields automatically, you can add a new field that asks, “Is this post about a run?” Cool, right? Ready to see how it works? Let’s check it out!
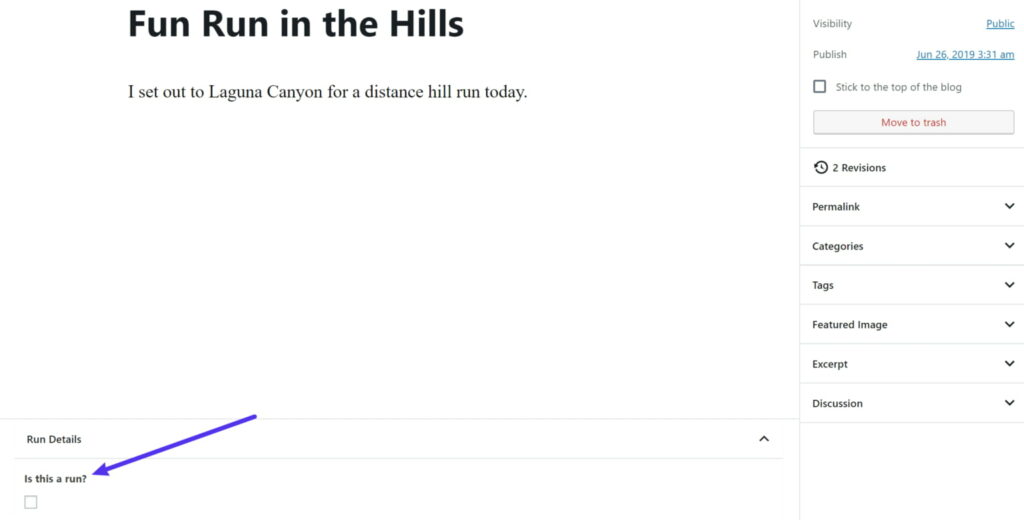
Here’s the cool part: if you tick the box that says “Is this post about a run?” then the fields for run information magically pop up. But if you leave it unchecked, they stay hidden.
It’s like having a secret switch that controls what shows up. Fun, right? Ready to add this magic touch to your site? Let’s go back to the main path and explore more!
That’s the magic of conditional logic!
To make this happen, go back and edit your field group. Now, add a new True/False field that asks, “Is this a run?”
It’s like adding a little switch to control when your run info fields appear. Ready for the next steps? Let’s keep going!
After that, go ahead and edit your current fields. Switch on the Conditional Logic for each one. This way, each field will only show up if you’ve checked the box that asks, “Is this a run?”
It’s like telling each field to wait until the magic switch is on before appearing. Ready for the last steps? Let’s see it all come together!

Showcasing Advanced Custom Fields on the Website’s Frontend
Alright, we’re halfway through our Advanced Custom Fields adventure. You can now put info into your custom fields, connect it with the right post type, and save it in your database.
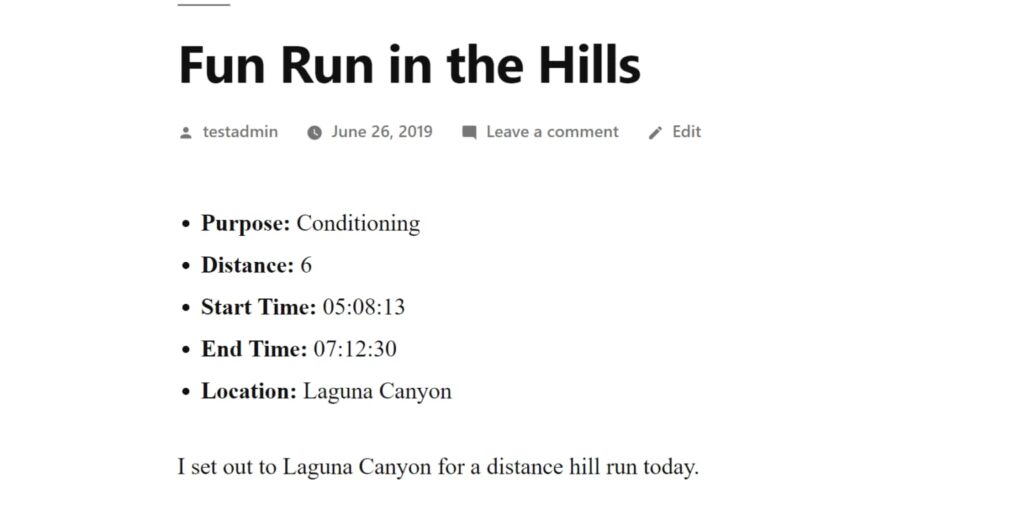
But here’s the thing – there’s still a small issue: the info from your custom fields isn’t showing up on the actual website!
Even though you’ve added cool fields to your blog post editor, your post still looks like any regular post when people visit your site:
Ready to make your posts stand out with all that cool info? Let’s tackle the second half of our journey!

Let’s solve that problem.
There are a few ways to show your Advanced Custom Fields info on your site. The method you pick depends on how comfortable you are with technical stuff. Here are three options:
- Your theme’s template files: This needs a bit of tech know-how but is usually the best choice, especially if you’re familiar with your theme’s template files.
- Shortcodes: Super easy but you’ll have to add shortcodes to every post where you want the custom field data.
- Elementor Pro: No need for PHP skills, but it’s a paid tool, and you’ll need to use Elementor Pro for your site design.
You can click on the method you like, or read through all of them. Your call! Ready to make your site look amazing? Let’s dive into the details!
Incorporating Advanced Custom Fields into Theme Template Files
Here’s the first way to show your custom field info – by adding some PHP magic to your theme’s template files. It’s a bit more advanced because you’ll need to tinker with the code, but it guarantees your custom fields show up in the same spot every time.
Here’s how you do it:
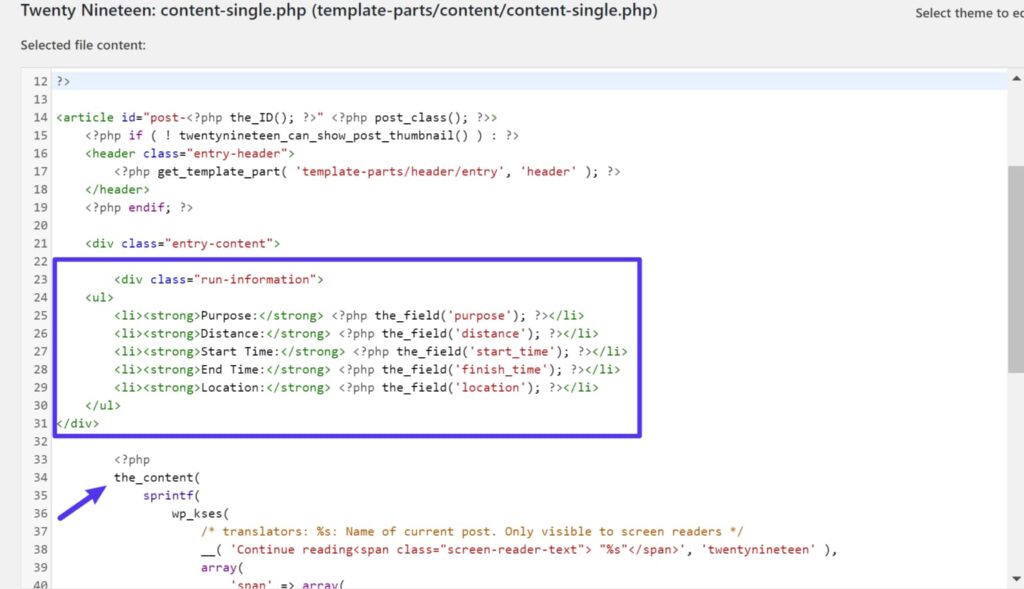
- Dig into your theme’s template files. For a regular blog post, it’s often “single.php.” Some themes split things up, like the TwentyNineteen theme, where you’d edit “content-single.php.”
- Once you find the right file, use Advanced Custom Fields’ function called
the_field()to display your field’s info. For instance:
phpCopy code
<?php the_field('FIELD_NAME'); ?>For our “Purpose” field, it would be:
phpCopy code
<?php the_field('purpose'); ?>
You can find the field name when you’re editing a field group. Feeling a bit lost? Don’t worry – there are other methods if this one seems too tricky for now. Ready for more? Let’s keep going!
Combining a bit of HTML with the PHP, you can create something like this to show all your fields:
phpCopy code
<div class="run-information"> <ul> <li><strong>Purpose:</strong> <?php the_field('purpose'); ?></li> <li><strong>Distance:</strong> <?php the_field('distance'); ?></li> <li><strong>Start Time:</strong> <?php the_field('start_time'); ?></li> <li><strong>End Time:</strong> <?php the_field('finish_time'); ?></li> <li><strong>Location:</strong> <?php the_field('location'); ?></li> </ul> </div>
If you want to put this above your regular post content, just add it to your theme template file above where you have the_content():
It’s like creating a special section for your running details, right at the top of your post. Exciting, isn’t it? Ready for another way to showcase your custom fields? Let’s explore more!
Now, if you refresh your blog post, you’ll see your special running details above the regular post content.
It’s like giving your readers a quick overview of your run before they dive into the full post. Cool, right? Ready for the next way to display your custom fields? Let’s keep going!
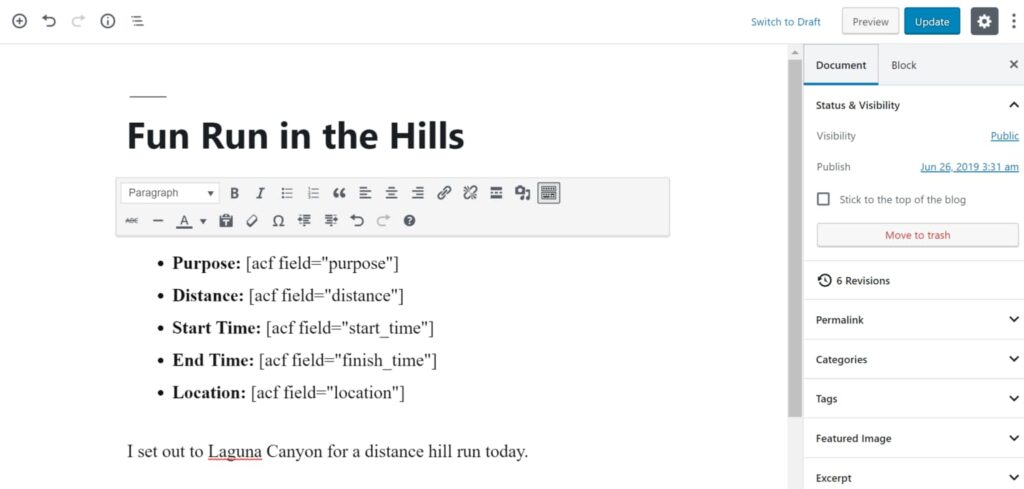
Presenting Data from Advanced Custom Fields Using a Shortcode
If you prefer a simpler way to show your custom fields, you can use shortcodes. But, here’s the catch – you’ll have to manually add the shortcode each time you want to display a custom field. No easy automation here.
The shortcode looks like this:
csharpCopy code
[acf field="FIELD_NAME"]
For instance, if you typed this in the WordPress editor:
It’s like a quick and easy way to insert your custom field data, but you’ll need to do it for each post. Ready for the third way to showcase your info? Let’s dive in!
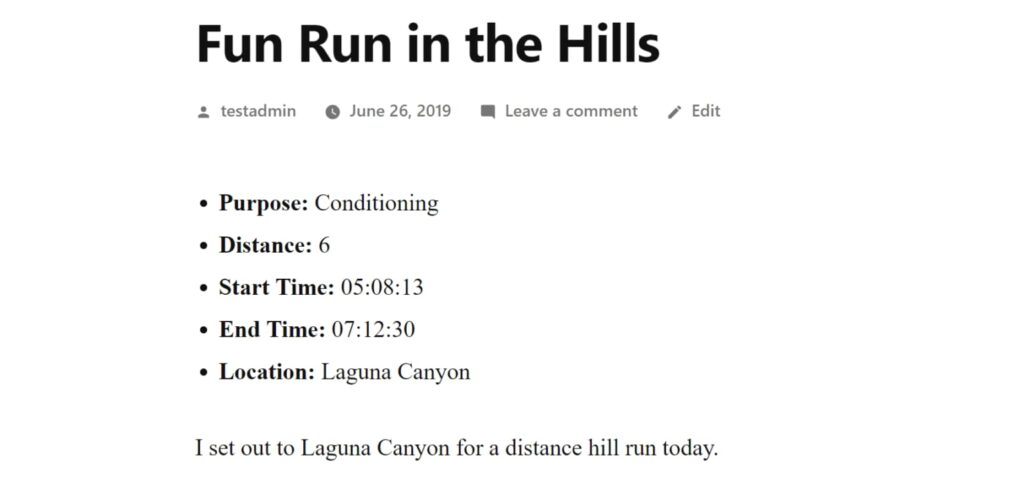
Displaying Custom Fields
Then, on your site’s front end, it will look just like the previous method with theme templates:
It’s like choosing a different way to get to the same awesome result. Exciting, right? Ready for one more way to showcase your custom fields? Let’s explore the last method!
Showcasing Advanced Custom Fields Using Elementor Pro
Elementor is a super popular tool for creating WordPress pages. It’s like a visual playground where you drag and drop things to build your site
With Elementor Pro, the paid extra, you can even design your theme’s template files. Plus, you get a cool feature – you can inject dynamic custom field data from Advanced Custom Fields right into your designs.
This is awesome if you want the freedom to automatically include custom field data but don’t want to mess with the code in your theme’s files.
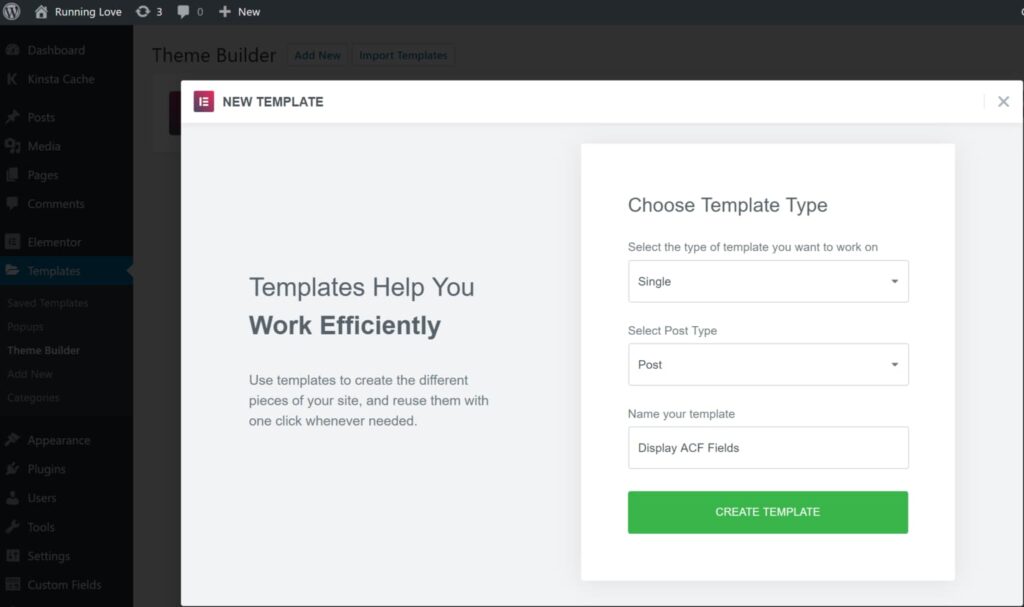
To start, head to Templates > Theme Builder. Make a new Elementor template for your Single post:
It’s like having a handy tool that lets you create cool designs without the need for coding skills. Exciting, right? Ready for the next steps? Let’s go!
Enhancing Design with Dynamic Content in Elementor Pro
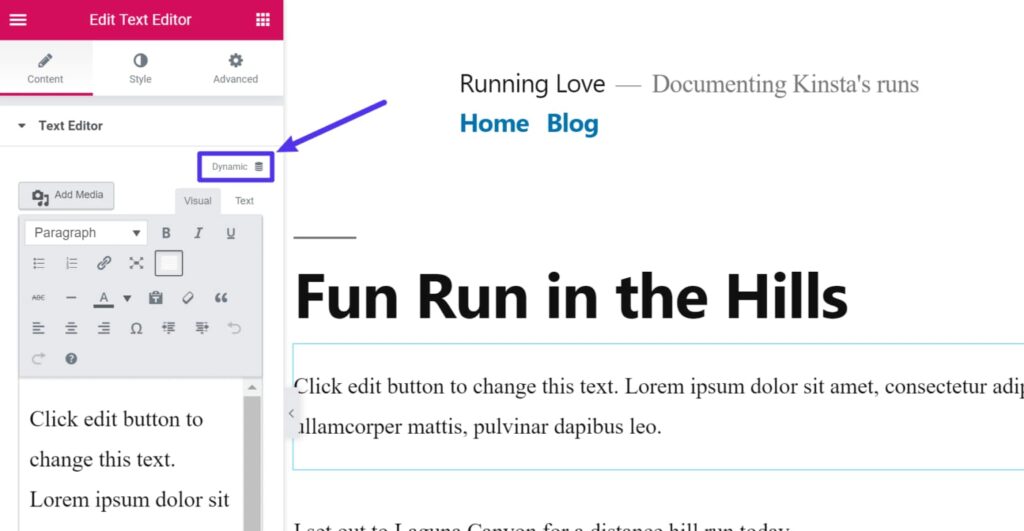
You can toss in the usual Elementor widgets for your Post Title and Post Content. Now, for showing off your custom field data, use the regular Text Editor widgets. The only twist here is that, instead of editing the text, pick the Dynamic option:
It’s like setting up little content blocks that automatically pull in your custom field data. Fun, right? Ready for the last steps to make your design shine? Let’s finish this up!
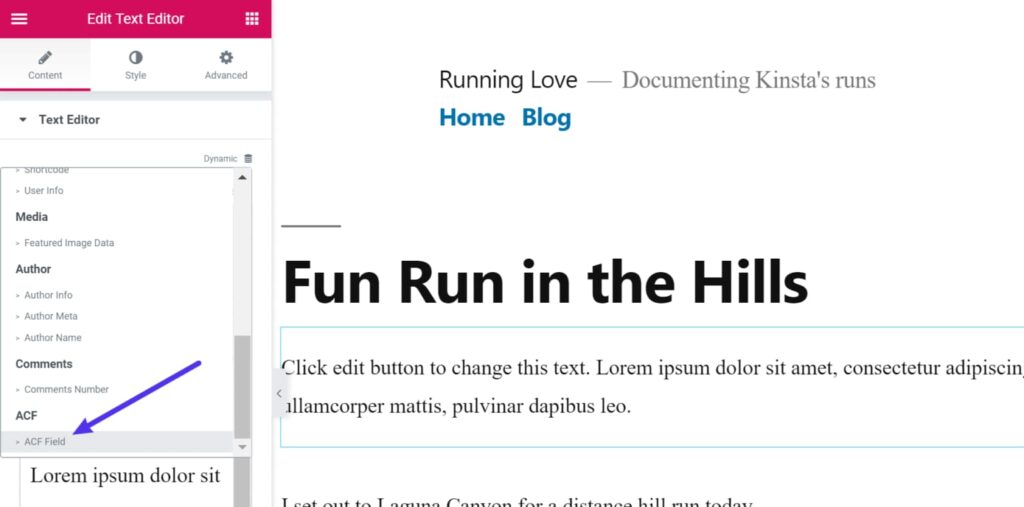
Following that, just pick ACF Field from the drop-down:
It’s like telling Elementor, “Hey, I want to pull in some cool data from Advanced Custom Fields!” Ready for the finishing touch? Let’s wrap this up!
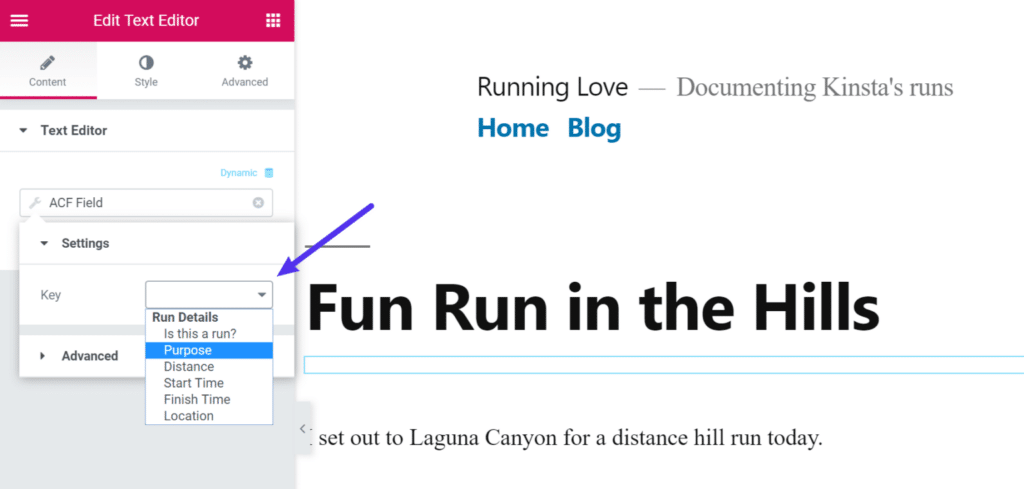
Now, just pick the specific field you added using Advanced Custom Fields:
It’s like choosing the exact piece of information you want to show off. Ready for the grand finale? Let’s see how it all comes together!
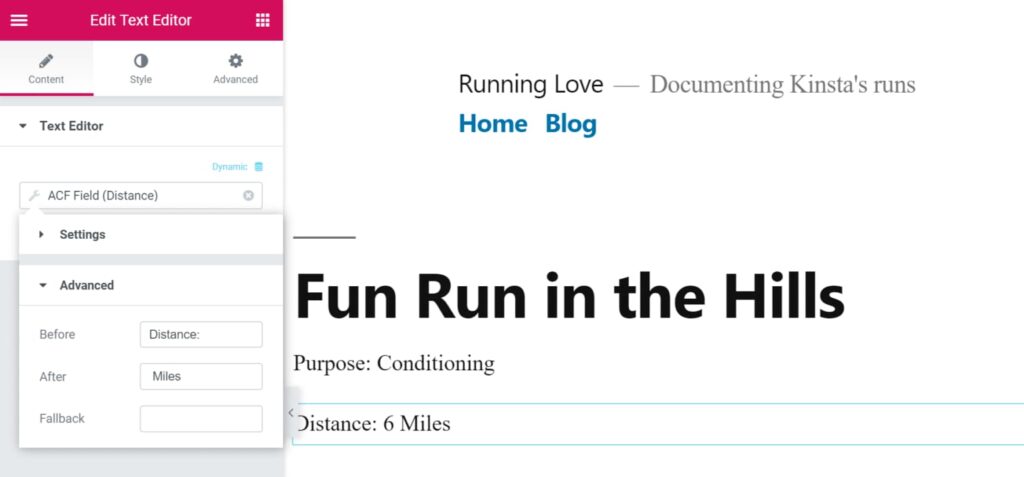
You can also use the fancy Advanced accordion tab to add a bit more info before or after, like labels and units:
It’s like giving your data a little extra flair. Exciting, right? Ready to see your design in action? Let’s wrap this up!
Easy, right? Now, just do the same for your other custom fields!
It’s like building a cool collection of data blocks for your site. Fun, right? Ready to see your finished design? Let’s check it out!
Summary
In conclusion, using Advanced Custom Fields in WordPress is like having superpowers for your website. It helps you add extra information to your content easily. Whether you’re blogging about running, food, or anything else, custom fields make your site more versatile.
You can use the free version for basic needs or go for the Pro version if you want extra features. With over 30 field types, Advanced Custom Fields is like a toolkit to design your site just the way you want.
Adding custom fields is simple – create a field group, add custom fields, adjust settings, and make it public. You can even use conditional logic to show or hide fields based on specific conditions.
To display your custom field data, you can choose from different methods like using theme template files, shortcodes, or Elementor Pro. Each method has its advantages, so you can pick what suits you best.
With Advanced Custom Fields, your WordPress site becomes a powerful tool to showcase information in a consistent and user-friendly way. It’s like turning your website into a personalized, organized, and efficient space. Fun, right? Now, go ahead and explore the possibilities for your own website!
Unlock access to all WordPress premium products