Divi, Themes, WordPress
25 Divi Themes Features You May Know. That Will Revolutionize Your Design And Productivity

Dec
Hello! Divi has a lot of great features that often go unnoticed. Whether you’re a seasoned Divi user or just starting out, it’s helpful to explore all the tools available.
In this post, we’ll highlight 25 features that can enhance your productivity and design. Some of these have been around for a while, so they might not be new to you, but we bet a few will still be surprising.
Introduction to Divi Theme
Before we start we are willing to introduce Divi Theme. Divi is a popular WordPress theme created by Elegant Themes. It is a versatile and user-friendly theme that allows users to build websites using a drag-and-drop page builder.
The Divi Page Builder is a tool for WordPress websites that lets you visually design pages. It’s included with the Divi Theme by Elegant Themes by default.
With Divi, users can create and customize websites without needing to write code. It offers a wide range of pre-designed layouts, modules, and styling options, making it suitable for various types of websites, from blogs and business sites to portfolios and e-commerce platforms.
The Divi Builder, which is a key component of the Divi theme, enables users to design and structure their web pages with ease, providing a flexible and efficient solution for WordPress website development.
You can now get your Divi Theme at just $249.00 $6.99 for a lifetime
Let’s dive in and discover some hidden gems in Divi!
1. Search Options Search Bar
This thing isn’t exactly a secret, but we guess some of you might not use this feature much. We get it, habits are hard to break. But trust me, this is worth getting used to. Instead of going through a bunch of clicks to tweak stuff, just use the search bar.
Need to add space around your module? Type “margin” in the search bar, and you’re there! Want all your fonts to match in a module? Just type “font” and change everything in one place.
A quick tip: You don’t have to click on anything before you search.
It looks through everything, no matter where you are. And guess what? This search bar is also there when you’re adding a new module. Just start typing what you want, and it’ll show up. No need to scroll through a long list.

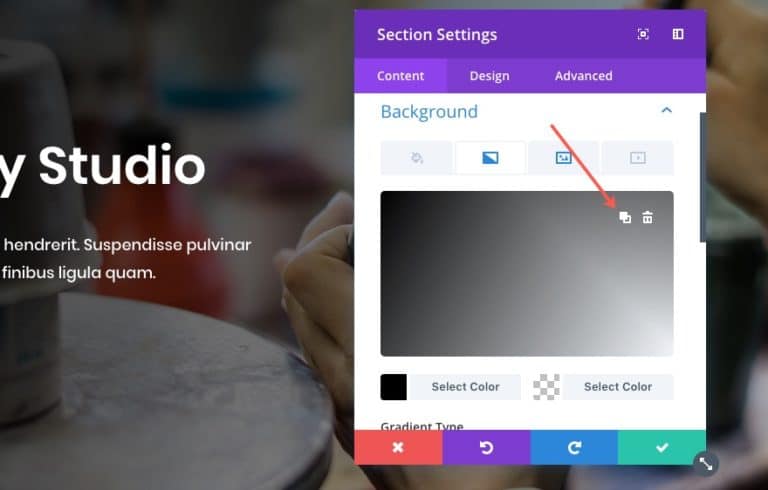
2. Place Gradient Above the Background Image
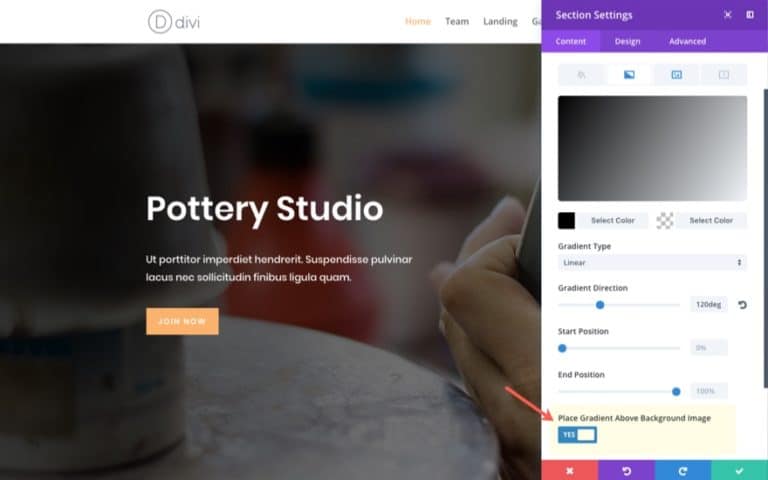
Here’s a cool thing that makes designs look better. When you want to add colorful layers to your pictures on a website, you can do it easily with Divi.
First, put a picture in your module. Then, add a mix of colors as a background. Choose “put the colors over the picture” in the options.
Just make sure the colors are a bit see-through so you can still see the picture. If you’re using the Visual Builder, it’s super easy to pick the right see-through level and colors for your picture.
3. Alternate Your Two Gradient Background Colors: There is a button for that.
No big deal, but we had to tell you about this because it’s so much easier.
Imagine if some of you are still changing color codes by hand! Sometimes, picking the perfect color mix is tricky, so it’s nice to have little tricks like this.
If you want to switch colors, just move your mouse over the color picker and click the icon that’s next to the delete one.
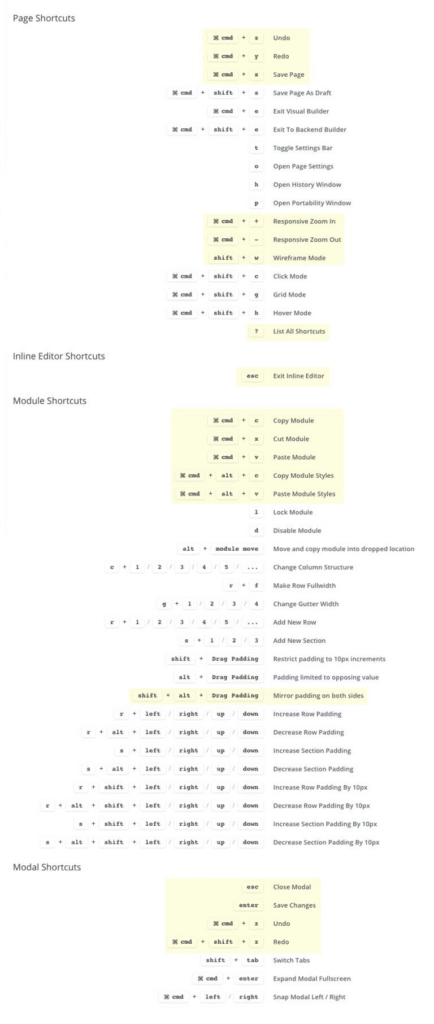
4. Keyboard Shortcuts
These things are easy to forget, but they really speed up your work. If you start using them, you’ll save a lot of time.
It’s like typing instead of writing by hand – much quicker! To see a list of these shortcuts, press the question mark (shift + ?) when you’re in the Visual Builder.
Then, click on the “shortkeys” tab. You can also find helpful videos there. Don’t forget about those! Here’s a list of all the shortcut keys, and I’ve marked the ones we think you should start with. We use them all the time.
5. Wireframe view
I want to tell you about this because it saves you from going to another place while you’re designing. If you’re used to the backend builder, maybe give the visual builder a try.
Also, there’s a quick way to open and close the wireframe view: press shift + w. If you want to see an even bigger picture of your layout in wireframe view, click the arrow on each section or row to collapse the whole thing.
6. Inline Editing
You can change text in a few spots without going to special settings. When you’re using the Visual Builder and want to edit text in a module, just click on the text. The inline editor will pop up, and you can change the text right there.
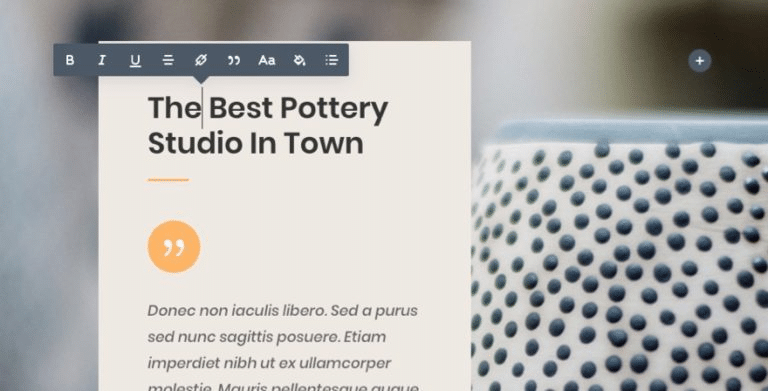
If you’re looking at the wireframe view in the Visual Builder, you can also change labels right there. If you want to rename a section label, you don’t have to go to special settings or right-click options. Just click on the label, and you can edit it right there.
Tip: Getting out of the inline editor might seem tricky, but it’s not. Just press the “esc” key, and you’re done.
7. Visual Builder Split Testing Using the Right Click Options
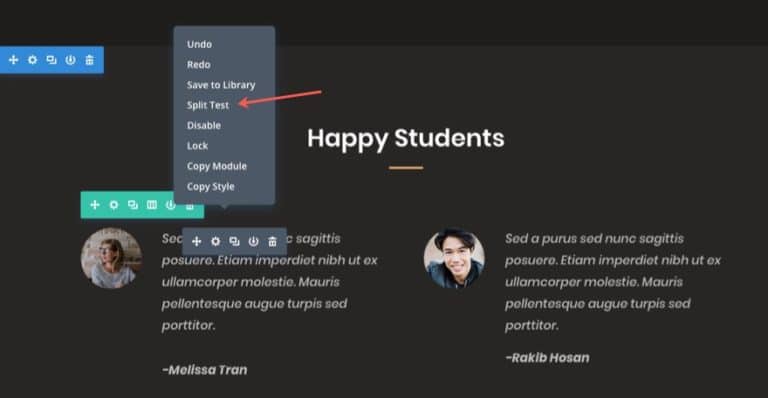
We’re always surprised by how easy it is to use the split testing feature in the Visual Builder. We won’t go into all the details here, but I’ll give you the basics. Right-click on the section, row, or module you want to test and choose a split test from the menu that pops up.
Then, pick what you want to test, like a form entry or button click. Divi makes a new version (split) of what you’re testing so you can make changes. When we first tried this, we didn’t know how to see both versions in the Visual Builder.
I used the wireframe view, but it turns out that’s not necessary. Once you pick a test goal, you’ll see arrows in the settings menu. Click them to slide through your different test versions.
8. Customizable Builder Settings
If you haven’t checked out the Builder Settings, it’s not too late. There are useful settings in there that can make your daily use of the Visual Builder better.
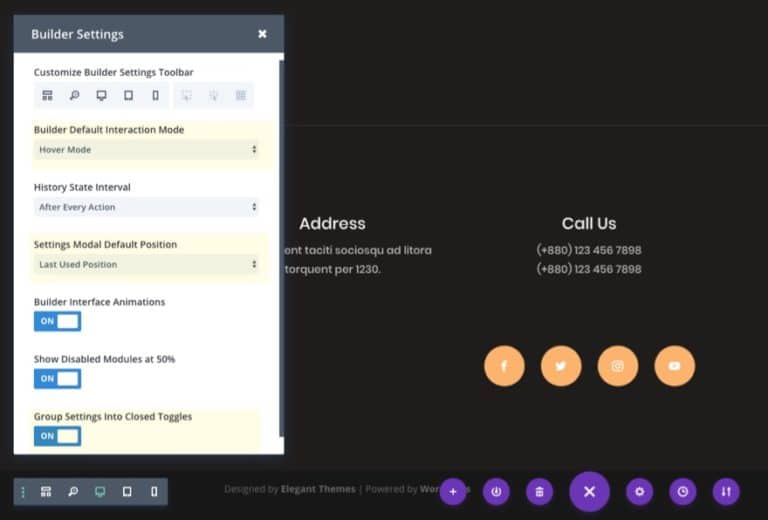
Here are three things we want to talk about.
- Settings Modal Default Position: We have a certain way we like our Modals to pop up when we’re editing on our big monitor (it’s the fixed left sidebar position). But sometimes, when we’re on a smaller screen like our laptop, we need to change it. So, we set our default position to be fixed left sidebar. This way, we don’t end up working with a position We’re not comfortable with before realizing we need to put it back the way we like.
- Group Settings into Closed Toggles: By default, Divi groups your setting options into toggles. That means you have to click to open those toggles to see the options inside. But you can turn that off. Your settings won’t be grouped into toggles anymore, so you can scroll through them without clicking to see more.
- Builder Default Interaction Mode: This one is about how you interact with the Builder, and it’s a personal preference. The default hover interaction mode shows the settings menu when you hover over any section, row, or module. The click mode can be useful too. Sometimes, it’s not clear which module you’re editing, especially if they’re close together. The click mode makes it clear by highlighting and outlining the module content before you click to edit. The Grid mode shows the settings menu for all sections, rows, and modules at once. We don’t use this as a default, but it’s handy when we are moving things around on our page.
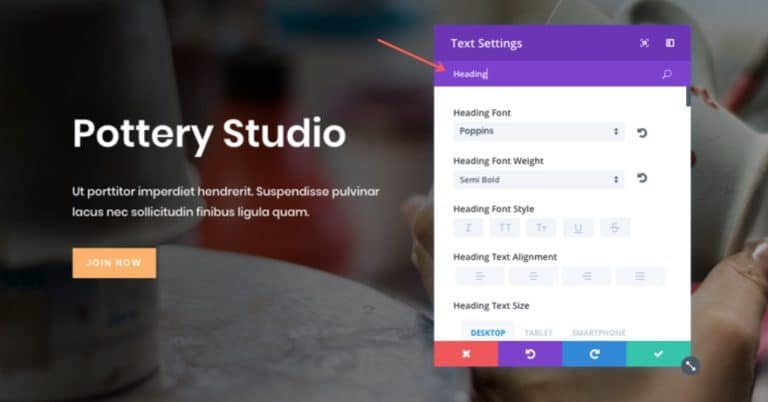
9. Link, Lists, and Blockquote design options with the Text Module
Remember the new tabs for handling custom text styles in the Divi Text Module? They make it easy to customize the design for your links, lists (unordered and ordered), and blockquotes. Using CSS for these changes can be a bit tedious, and sometimes you want to switch things up for different modules. These options let you do that easily.
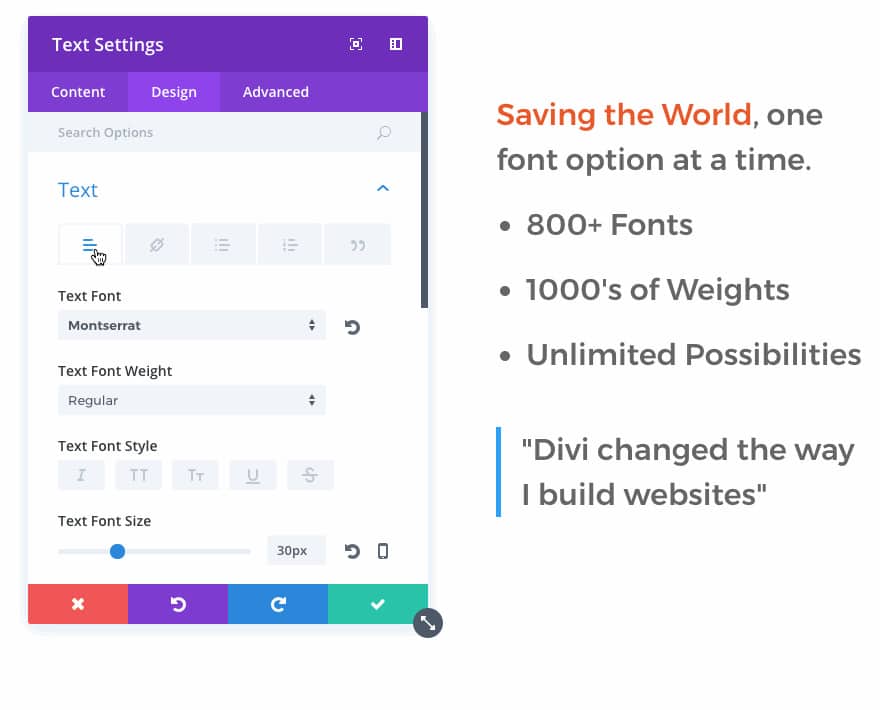
Let us share two options that are pretty cool and easy to miss:
- List Style Options: If you look under the Unordered and Ordered Lists tabs, you can quickly change how your lists look or even remove the style. You can also adjust how far the list items are indented and where the style shows up.
- Blockquote Style Options: Check out the Blockquote tab, and you can change how the blockquote looks. You can adjust the thickness of the border and pick the color that makes it stand out.
10. Design options for all 6 Header levels
In addition to what we mentioned earlier (#9), there’s also a new tabbed setup for text header levels. So, if you have a module with different headers (like h1, h2, h3, etc.), you can make each header look different in the module design settings. Just go to the Design tab, open the Title Heading or Header Text section, and pick the tab for the header type you want to customize.
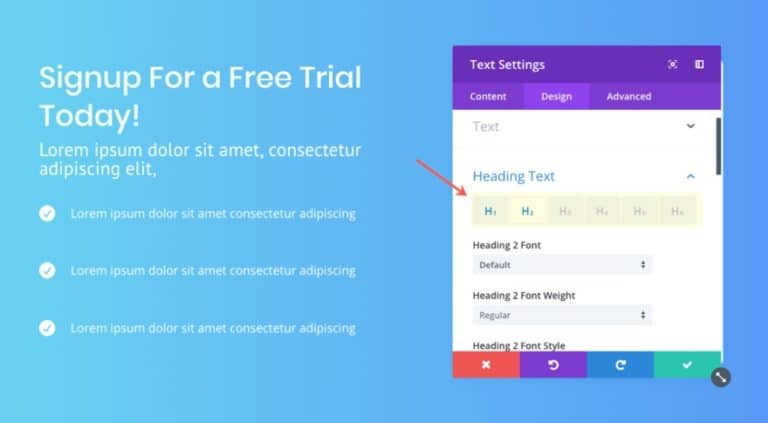
Here’s a tip: You can tell which header levels you’ve customized because the tab will have a blue label. If the label stays gray, it means the default settings are still active for that header level.
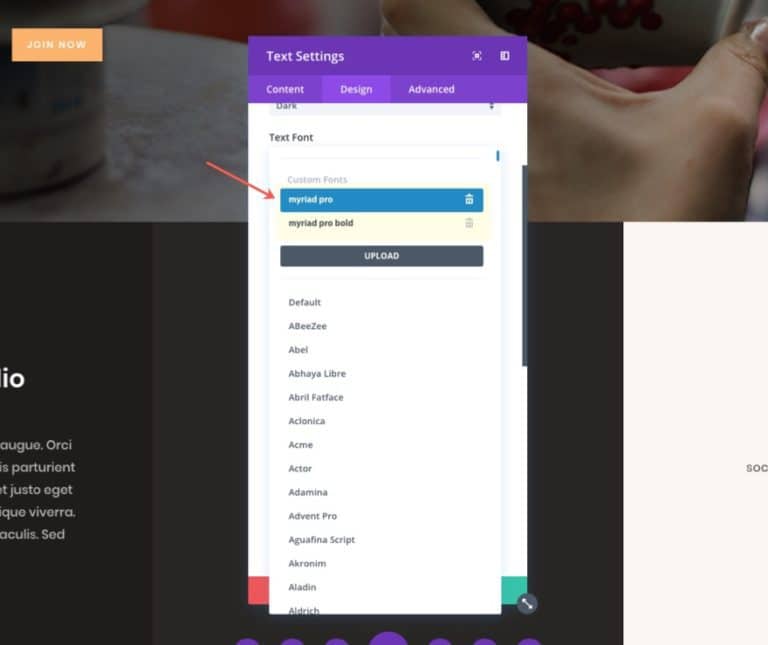
11. Upload Custom Fonts with Divi Modules
Maybe the Upload button has stayed hidden in plain sight for some of you. If that’s the case, you should definitely use this handy feature. You can easily upload custom fonts in different file types (like eot, woff2, woff, ttf, otf).
Divi keeps these fonts stored for you so they’re available for all modules on your site. Just pick a text element, click to change the font, and use the Upload button. A pop-up will appear where you can name and add your font file.
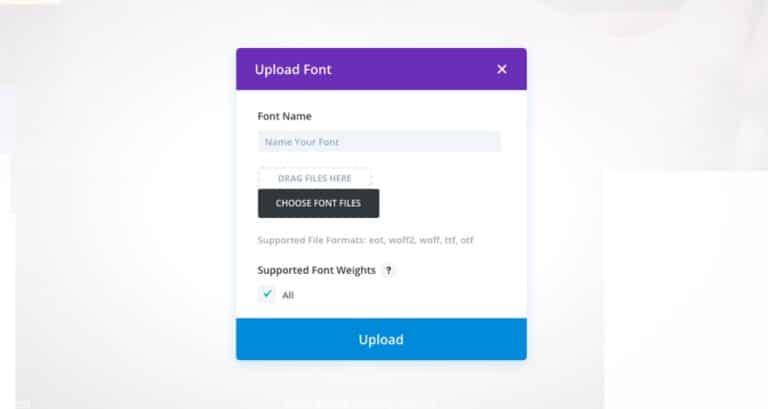
Once you’ve picked your file, click the upload button. Now, you can use these custom fonts from the same list of fonts in the Divi Builder.
12. Remove Space Below the Image
Once you’ve picked your file, click the upload button. Now, you can use these custom fonts from the same list of fonts in the Divi Builder.
This feature has been available for a while, but there’s a chance you missed it or didn’t realize how important it can be. This option only changes images when they’re the last thing in a column. When you turn it on, the space between the bottom of the image and the next section disappears. This means the image touches the top of the next section on the page. One way to use this is to place your header images so they touch the section below.

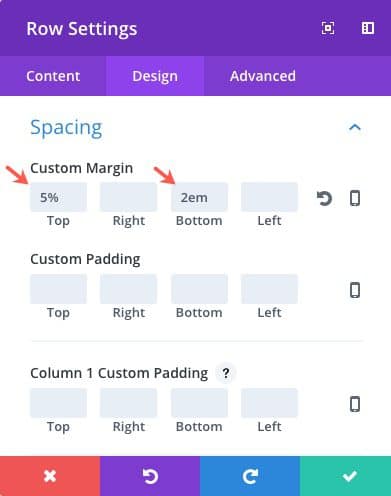
13. Add different units for different inputs
Normally, when you type a number in certain places in the Divi Builder Settings, Divi thinks it’s in pixels. But you’re not stuck using pixels. You can also use other units like %, em, vh, and vw. For example, % works well for mobile.
If you set a top margin at 5% (instead of something like 100px) on desktop, the margin will adjust proportionally to 5% of the section’s size on mobile. This keeps things neat on different browser sizes. You can even use a mix of units.
For instance, you might want to keep your height fixed by setting top and bottom margins in pixels and then use a percentage for left and right margins. Just add the unit after the number when you’re filling in the inputs.
14. History States
Think of history states as a time machine for your changes in the Divi Builder. Instead of using undo and redo options or shortcuts, you can easily see a list of your edits by clicking on the Editing History link in your settings menu.
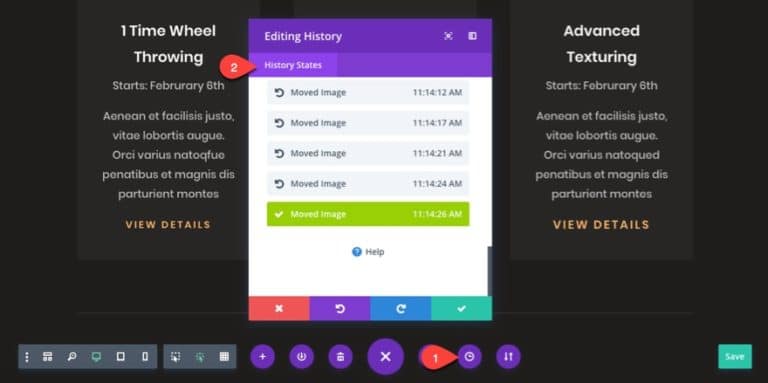
What’s neat about this feature is that it shows the time and a short description for each change in the history list. If you pick a history state to go back to an earlier version, you can always check the list to go forward to your latest edit. It lets you move backward and forward through your past edits while seeing the changes happen in real time with the Visual Builder.
Remember, these history states are saved as a Backbone collection or JavaScript object, not in your database, so it won’t make your database bulky. But keep in mind, if you exit the builder while editing the page, you won’t be able to revisit the history states. So, keep the builder open until you finish your design. The history states start when you load the page or builder.
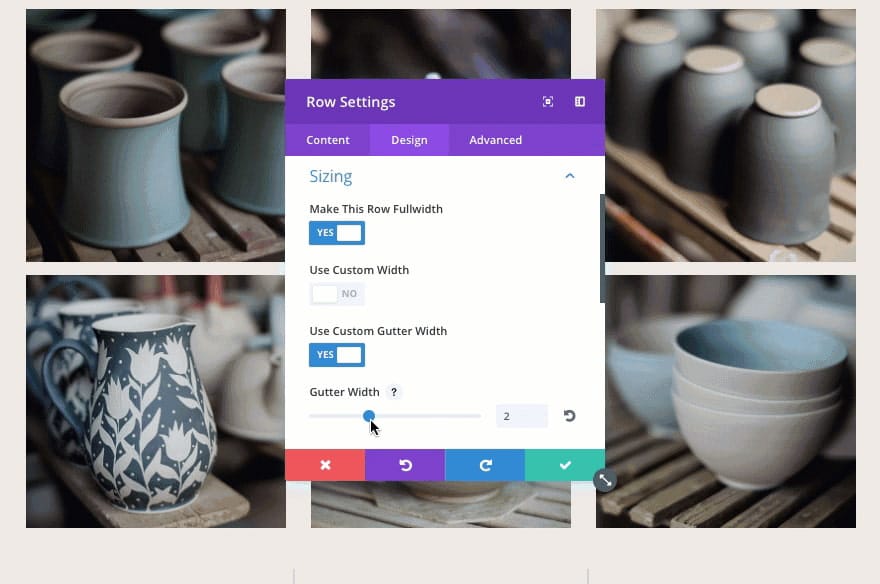
15. Custom Gutter Width Option (great for grid layouts)
Gutter width is like the space (margin) between columns in a row. You can choose values from 1 to 4 for the gutter width:
- 1 means there’s no margin between columns.
- 2 means a 3% right margin between columns.
- 3 means a 5.5% right margin between columns.
- 4 means an 8% right margin between columns.
This is really useful when you’re designing grid layouts. You can create grid layouts manually using columns and modules, or you can set up grid layouts automatically in certain modules like the portfolio and blog modules.
For instance, if you want to make a full-width grid layout for images without any space between them, you can make a new row with three columns, add your images, make the row full-width, and set a custom gutter width of 1.
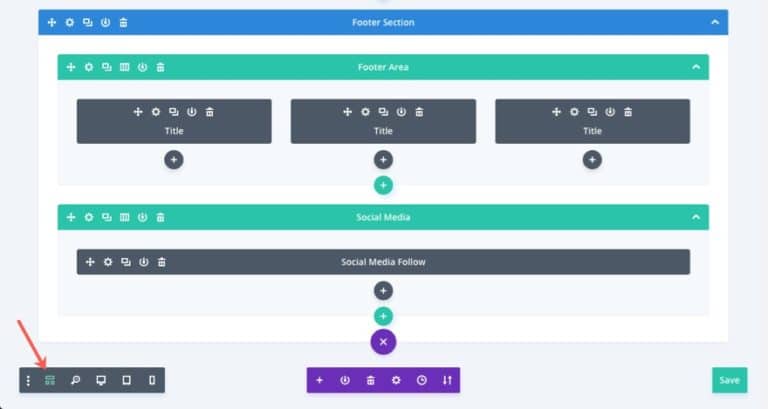
16. Right-Click Options
To find this feature, just right-click on any section in the Divi Builder.

While we won’t cover all the right-click options here, we want to highlight a couple that are only available when you right-click. They’re really handy and easy to miss.
Lock
You, as an admin, can use the lock feature to prevent others from altering specific items. It’s a handy way to keep your editors from changing content that should stay the same. It also helps you avoid accidentally modifying an important section.

Collapse and Rename
I enjoy using these two options together as we work on longer web pages. Scrolling up and down to find the sections we need to edit can be tiring.
That’s why we use the right-click collapse option to condense large completed sections of our webpage.
Once they’re collapsed, we use the right-click option to rename the section with a label that’s easy for us to recognize as an admin.
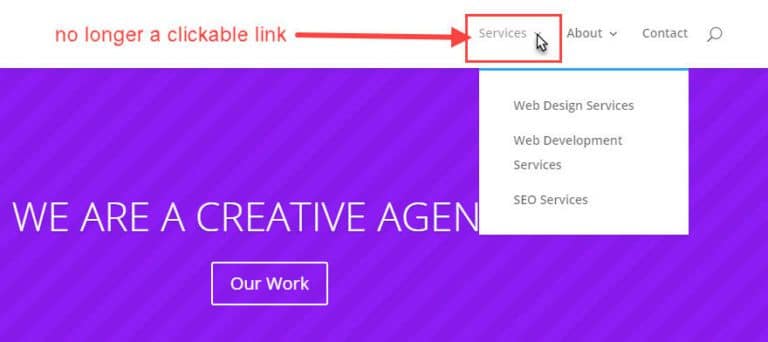
17. Disable Top Tier Dropdown Menu Links
To find this feature, go to Divi, then Theme Options, and navigate to Navigation, followed by General Settings.
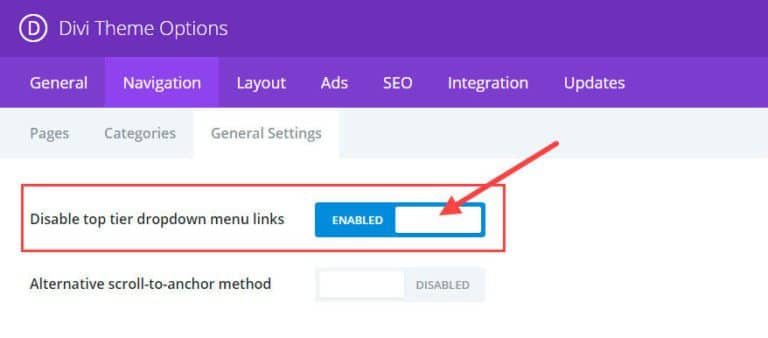
Just to be clear, top-tier dropdown menu links are the main parent links that stay visible on the navigation menu. The sub-tier links are the ones that show up when you hover over the top-tier parent link. When you disable the top-tier dropdown menu links, they become non-clickable. Instead, they act as labels to organize your sub-links. For example, if you’re creating a site for a company offering three main services, each needing its own page, you can disable the top-tier “services” link. Now, it serves as an organizational label without being a clickable link.
18. Alternative Scroll-to-Anchor Method
To find this feature, go to Divi, then Theme Options, and navigate to Navigation, followed by General Settings.
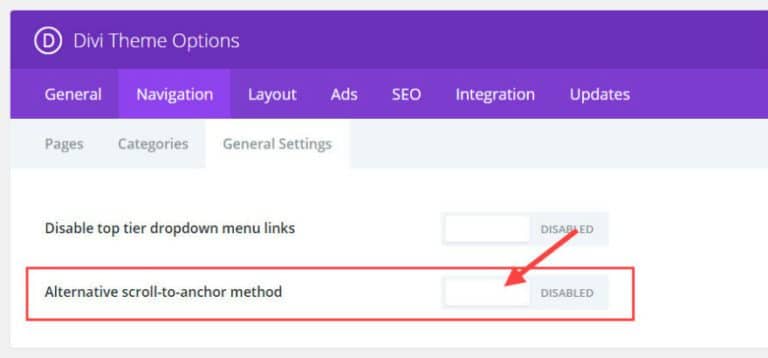
If you’ve ever tried to create a link directly to a CSS ID using an anchor link from an external page, you might have noticed that the page doesn’t end up in the right spot. Sometimes it’s too low, and part of the content gets cut off at the top. Here’s what our screen looks like after linking to our CSS ID from an external page. You can’t see it, but the title of the section has been cut off.
Turning on the Alternative scroll-to-anchor method fixes this issue. It not only puts the user in the right place, but it also loads the top of the page first before scrolling down to the CSS ID. This is useful for users who might be confused and not realize at first that they are looking at a specific section of the page.
19. Hide The Logo on mobile
To find this feature, go to Divi, then Theme Customizer, and navigate to Mobile Styles, followed by Mobile Menu.
If you ever need to hide your logo on mobile, Divi makes it very easy. But it’s one of those options that is easy to overlook. Save yourself some time and don’t worry about messing with additional CSS.
20. Primary Menu and Secondary Menu Dropdown Animation
To find the primary menu settings, go to Divi, then Theme Customizer, and navigate to Header & Navigation, and then click on Primary Menu Bar. There, you’ll find the Dropdown Menu Animation options.
For the secondary menu settings, go to Divi, then Theme Customizer, and navigate to Header & Navigation, followed by Secondary Menu Bar, and then Dropdown Menu Animation.
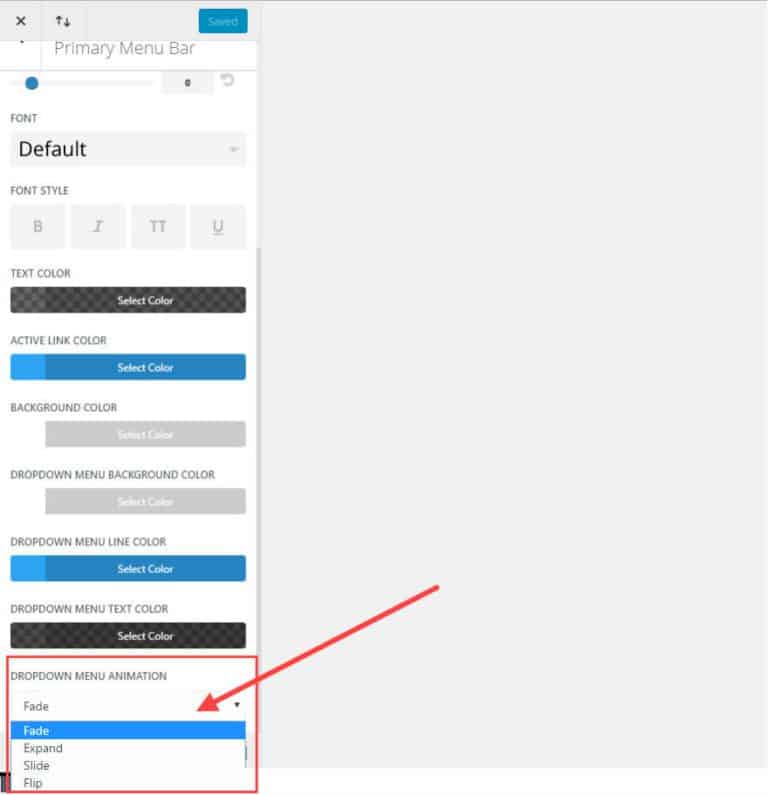
You’re not stuck with the usual fade animation for your dropdown menus. In the Dropdown Menu Animation section, there are four options:
- Fade (the default)
- Expand
- Slide
- Flip
Sometimes, small touches like these can really make your menu stand out.
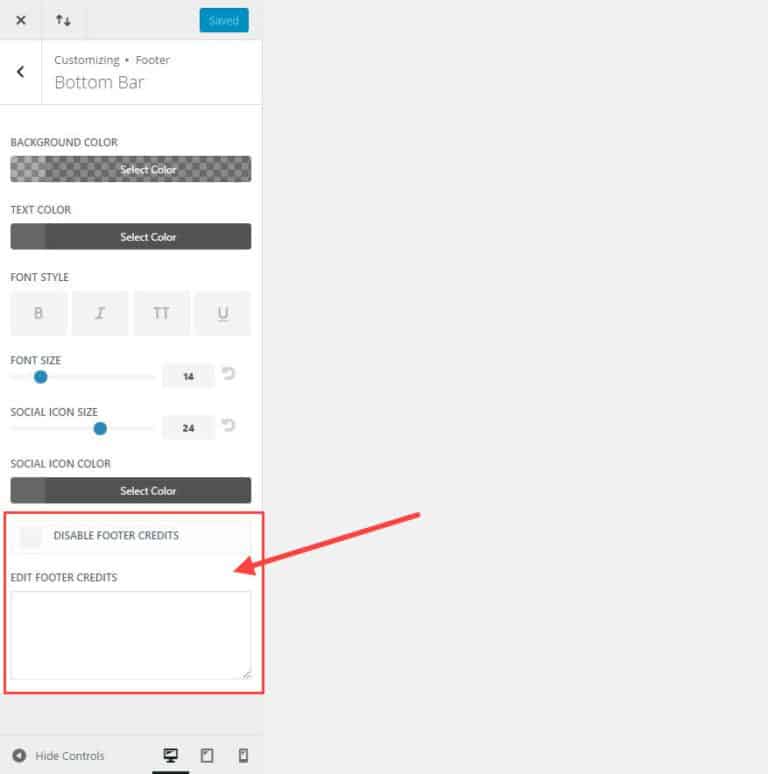
21. Edit (or disable) Footer Credits
To access this feature, go to Divi, then Theme Customizer, and navigate to Footer. Inside the Bottom Bar, you can Disable Footer Credits or Edit Footer Credits.
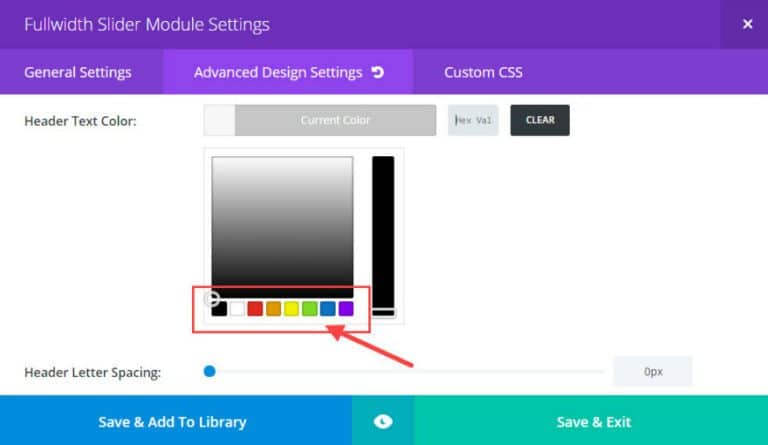
22. Changing Divi’s Default Color Palette
If you know the color theme of your website, simply update the default colors to include those needed for your design. This option can save you a lot of time since these colors will be available throughout all modules when building and editing your site.
23. Divi’s Page Settings
To access this feature, click on the Gear Icon in the Settings Menu at the bottom of the Visual Builder.
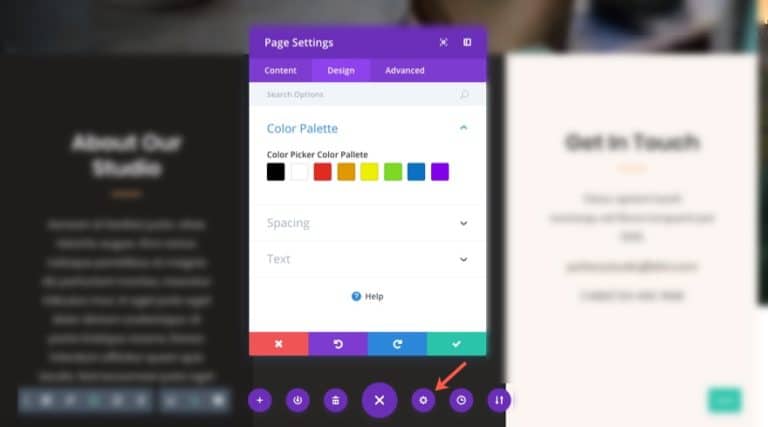
Since Divi 2.7, the Divi Builder Settings allow you to set default settings (and override theme settings) for the specific page you’re working on. This is a super handy time-saver, especially for building landing pages or pages that need a unique design.
You can set a color palette for your page, overriding the default palette in your Theme Options. You can also add page-specific custom CSS. Since the CSS only loads on that particular page, you don’t have to target specific post IDs or access your child theme style.css file.
One special feature of the Divi Builder Settings is the ability to enable the Divi Leads split testing system for your page. This powerful tool is too valuable to ignore.
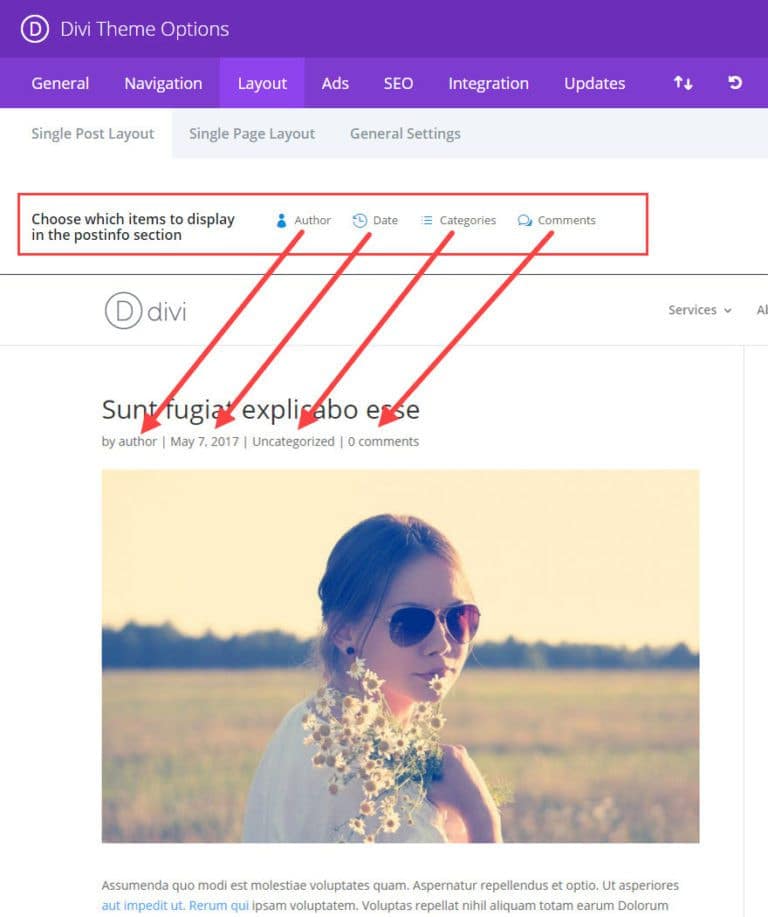
24. Choose What Meta Info to Display on Blog Posts
Even though this Divi feature has been available since the beginning, it’s easy to miss. Each of your blog posts has certain meta information that appears under the post title (author, category, date, comments).
But, depending on how you use your blog, you might not want this extra information distracting from your content. Divi makes it simple to customize this info for you.
Change Meta Info for Single Post Layout
To find this feature, go to Divi, then Theme Options, and click on the Layout tab. Inside, you’ll see Single Post Layout.
You can easily click to turn on or off each of the four pieces of meta info for all your single blog posts. Disabled meta info will appear faded out.
Change Meta Info for Blog Page Post Excerpts
To access this feature, go to Divi, then Theme Options, and click on the Layout tab. Inside, you’ll find General Settings.
To change the meta info shown on your blog page post excerpts, simply click on each of the four meta items you want to display or hide.
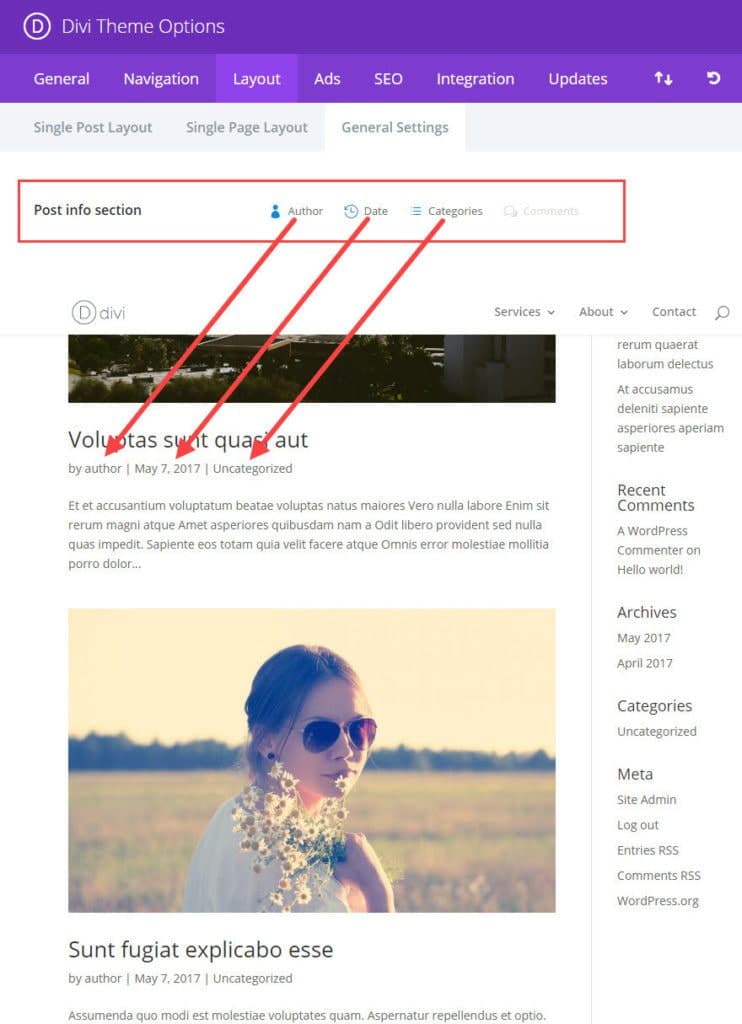
If you’re using the Divi Blog Module for your blog page, the settings mentioned above won’t apply. You’ll need to adjust the meta info you want to display within the Blog Module General Settings.
25. The Code Module
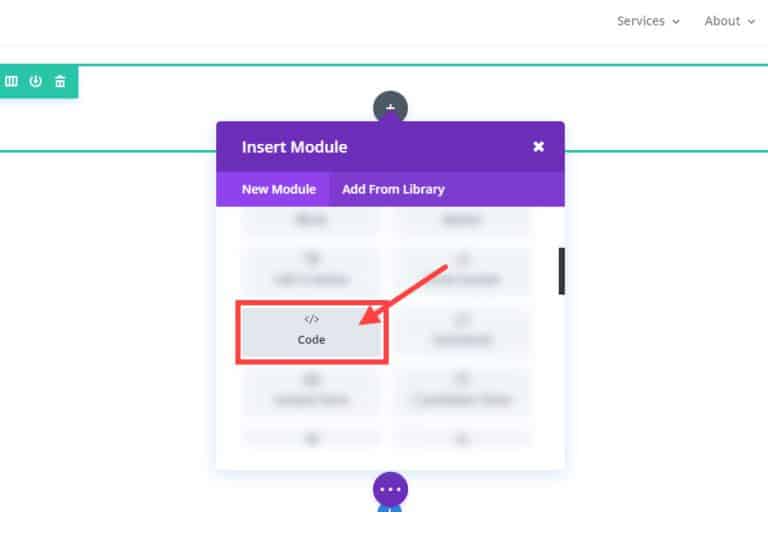
The Code Module is a fantastic but often overlooked feature of Divi. It grants you the ability to add HTML to your page without any restrictions. This module also lets you include HTML elements on specific pages without affecting others. The possibilities with the Code Module are limitless, but here are a few practical ways you can use it:
- Import external CSS files like Animate.css for pages where you need animations.
- Add JavaScript code blocks or libraries for specific page functionalities.
- Integrate third-party plugins like the Revolution Slider.
- Utilize the Fullwidth Code Module to embed a Typeform for interactive questionnaires or contact forms.
- Create a floating action menu.
- Design a slide-in top bar ad.
- Incorporate a floating action button.
These applications provide flexibility and customization to enhance your website.
Final Words
When you’re learning something new, it can feel overwhelming, like trying to drink from a fire hydrant. Undoubtedly, there are things you may have missed and need to review. The aim of this post was to revisit some Divi features that are easy to overlook but incredibly useful. Do you have any features you believe should be on this list? Please share; We’re sure we can all benefit. We look forward to your comments.
To acquire the Divi theme at the exclusive rate of $6.99, kindly click the button below.
Unlock access to all WordPress premium products