
Elementor, Plugins, WordPress
How to Add Fonts in WordPress Elementor: Transforming Your Website with Creative Typography
Jan
Are you looking for ‘How to add fonts in WordPress Elementor?’ Well, you’re in the right spot!
This guide will help you understand how to put special fonts into your Elementor projects. This way, your website can have its own style that matches your brand and stands out from others.
Elementor now allows you to use your own customize fonts. You can add fonts you host yourself and those from various sites.
This lets you give your Elementor projects a distinctive style that matches your brand.
So, you tired of the usual plain fonts like Arial and Helvetica? Want some thing distinct that enables you stand out? Consider using a custom font.
While Elementor already has 800+ Google fonts, sometimes you need more. Investing in your website’s font style is valuable for a professional look, and that’s where custom fonts come in.
Now, we’ve made it easy for you to upload your own fonts without needing extra plugins.
Just upload your custom font formats, and you’ll see them in the widget typography settings right away.
Take full control of your fonts and switch them up easily with Elementor.
What Are Custom Fonts in WordPress?
Custom fonts in WordPress mean you can use special and personal fonts on your website instead of the usual ones.
In simpler terms, it lets you choose fonts that match your website’s style and brand.
Instead of only using the regular fonts, you have the freedom to choose something that fits your website’s character.
This way, your site can stand out and feel more like it belongs to you.
This option lets you make your WordPress site look better by picking fonts that match how you want it to look.
By incorporating custom fonts, you can create a more distinctive and memorable online presence.
This flexibility in font selection empowers website owners to make their content more visually engaging and reflective of their individuality.
Adding Custom Fonts to WordPress Manually
Adding custom fonts to WordPress manually may be challenging for users with limited technical skills.
Here’s a simplified step-by-step guide involving working with WordPress folders:
- Use an FTP patron to hook up with your WordPress site. In your theme’s folder, create a new folder named “fonts” at wp-content/themes/fonts.
- After creating the “fonts” folder, upload all your font files into it.
- Open your theme’s stylesheet (style.css) and insert the following code:
@font-face {
	font-family: 'nameofnewfont';
	src: url("/fonts/nameofnewfont.woff2") format("woff2"),
		 url("/fonts/nameofnewfont.woff") format("woff");
	font-weight: normal;
	font-style: normal;
}
Replace ‘nameofnewfont’ with your chosen font name and adjust the file names accordingly.
- Configure the elements using this font by adding them to the same stylesheet.
This method can be challenging for beginners, especially when adding configurations like italics or bold, requiring repetitive coding.
How to Add Custom Fonts to WordPress Using Elementor
To display custom fonts on your WordPress site for visitors to see. You need to upload the fonts in standard file formats compatible with various browsers. There are several font formats, each catering to different browser requirements:
- Web Open Font Format (WOFF): This format is highly recommended as it is supported by all modern browsers.
- Web Open Font Format 2.0 (WOFF 2.0): This TrueType (TTF) / OpenType (OTF) font offers better compression than WOFF 1.0.
- TrueType Fonts (TTF): Developed in the late 1980s by Apple and Microsoft.
- SVG Fonts/Shapes: SVG fonts enable the use of SVG as glyphs, supporting older versions of iPhones.
- Embedded OpenType Fonts (EOT): This font file is compatible with Internet Explorer but not with other browsers, suitable for older versions of IE.
In Elementor, the process of uploading custom web font formats is made simple:
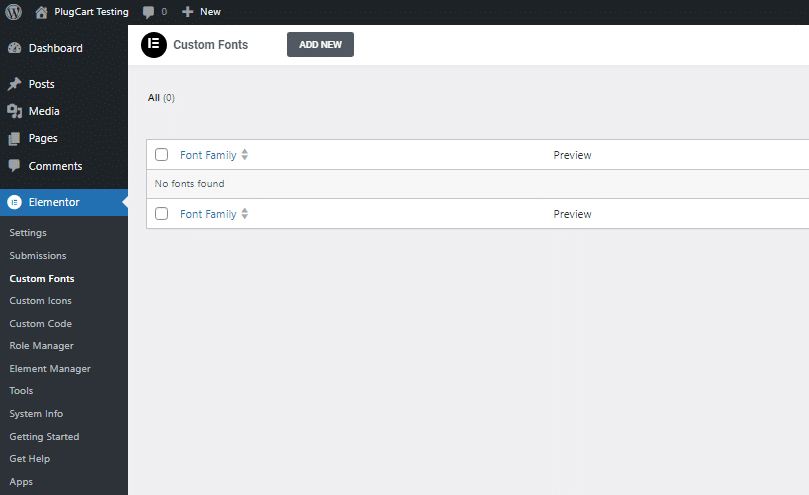
1. Navigate to the WordPress Dashboard > Elementor > Custom Fonts and click on ‘Add new.’
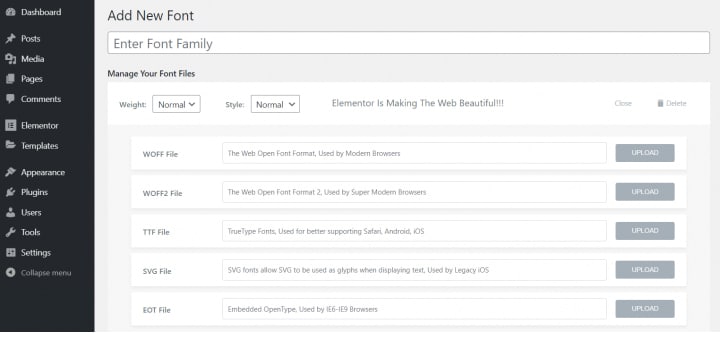
2. To use a new font on your website, type in the font name and upload its files like WOFF, WOFF2, TTF, SVG, or EOT. It’s a good idea to upload all these files so that your font works well on different web browsers. This way, your website can display the font correctly, no matter which browser your visitors are using.
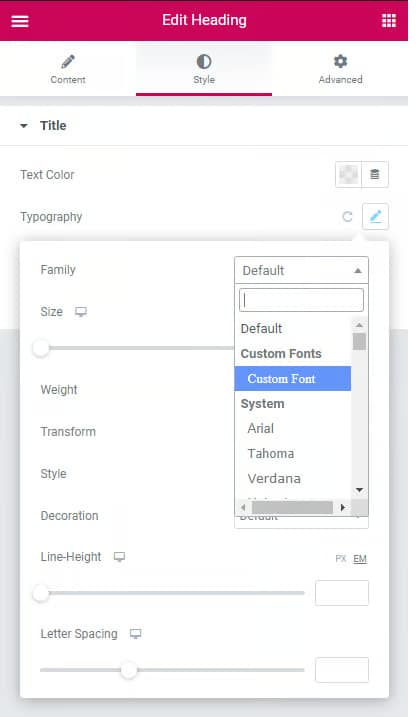
3. After you’ve uploaded the new fonts, you can use them in any text-containing widget. If you’re using Elementor, go to your pages and start incorporating the new fonts. Just add a heading or any text widget, then go to Style and choose your custom font under Typography. It’s a simple way to apply your uploaded fonts to the text on your pages.
How To Choose Right Fonts?
Where to Get Custom Fonts? (Free + Premium)
Finding custom fonts for your WordPress Elementor website can be an exciting endeavor, offering a unique touch to your design. There are various online platforms where you can discover both free and premium fonts to enhance the visual appeal of your site.
Free: Websites like Dafont.com, Myfonts.com, OnlineWebFonts.com, and FontShop are popular choices for downloading a wide range of fonts.
Premium: You can explore premium font options such as Sofia Pro, Proxima Nova, Mont, Futura PT, and more, available for purchase.
However, there’s a service that offers an even more enhanced experience, and it’s Adobe Typekit.
Adobe Typekit Now in Elementor

Adobe Typekit offers a personalized font experience, allowing users to seamlessly integrate a vast selection of professional fonts into their web design projects.
This subscription-based service syncs fonts to both computers and websites, providing designers with instant access to thousands of fonts directly within their familiar Photoshop interface.
With two free Typekit fonts available for trial, users can explore the service before committing. The integration of Typekit with Elementor simplifies the font usage process.
By entering the Typekit key in Elementor’s settings dashboard, designers can effortlessly access and apply Typekit fonts in various typography settings without the need for manual downloads or coding.
The process is particularly advantageous for designers transitioning from Photoshop PSD to a live WordPress design, offering a straightforward and efficient workflow.
To utilize this integration, users can add their Typekit Kit ID under Elementor > Settings > Integrations, click ‘Sync Kit,’ and wait a few minutes to see all their Typekit fonts in Elementor. It’s important to note that there might be a short delay as Adobe updates its CDN network after adding the key.
These resources provide an extensive collection of fonts that can complement your design preferences and elevate the overall aesthetics of your Elementor-powered website.
Whether you opt for free alternatives or invest in premium selections, experimenting with different font pairings can add a professional and unique touch to your web pages.
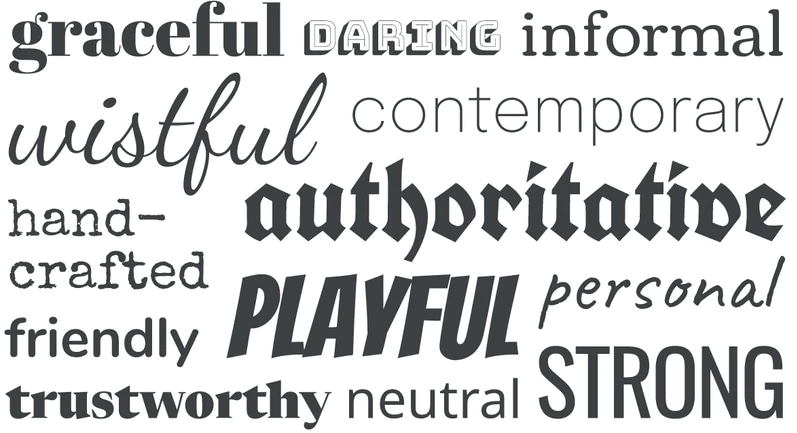
Considerations for font pairing and branding
Considerations for font pairing and branding are crucial in creating a cohesive and visually appealing design. The principles outlined in the article emphasize the importance of contrast, maintaining key qualities, and understanding the mood of fonts.
- Applying these principles ensures that fonts work harmoniously, enhancing readability and visual interest.
- The recommendation to use sans-serif for headings and serif for body text provides a traditional yet effective approach.
- Testing fonts in different variations, studying successful pairings, seeking feedback, and trusting one’s intuition are additional key considerations.
- When applied thoughtfully, font pairing contributes significantly to brand identity and user experience, playing a vital role in creating a lasting impression on the audience.
How to Test Font Readability and Accessibility
Ensuring font readability and accessibility is crucial for delivering a positive user experience across various devices and platforms. Here are key methods to effectively test font performance:
- Online Font Testing Tools:
- Utilize tools like Font Tester, Fonts Ninja, or Typetester to preview fonts on different screen sizes, resolutions, and operating systems.
- Browser extensions like WhatFont or Fontface Ninja can help identify and test fonts on any website.
- User Testing and Feedback:
- Conduct user testing on diverse devices and platforms using platforms like UsabilityHub, UserTesting, or UserZoom.
- Collect feedback to understand real users’ experiences and perceptions of font readability.
- Readability Guidelines and Best Practices:
- Adhere to readability guidelines such as selecting fonts compatible with brand identity, ensuring clarity and consistency across devices, and maintaining appropriate size, spacing, and hierarchy.
- Font Performance and Accessibility Testing:
- Use tools like Google PageSpeed Insights, GTmetrix, or Pingdom to assess font impact on loading speed and responsiveness.
- Ensure font accessibility by following Web Content Accessibility Guidelines (WCAG) using tools like WebAIM, WAVE, or A11y.
- Experiment with Font Combinations:
- Employ tools like FontPair, Fontjoy, or Canva Font Combinations to test different font pairs that create a cohesive look and feel for your brand.
- Review Font Examples and Inspiration:
- Explore platforms like Behance, Dribbble, or Awwwards to learn from font trends and best practices in web design and typography.
- Consider Other Factors:
- Account for additional considerations such as the mood evoked by fonts, alignment with content themes, and staying informed about current font trends.
Testing font readability and accessibility through a combination of these methods ensures a comprehensive approach, resulting in a visually pleasing and user-friendly design across diverse platforms.
Fonts Weights and Styles
Custom fonts are organized into families, each having its own weights and styles, which are uploaded separately. A font family might have a range of weights from 100 to 900, including options like Normal, Bold, Bolder, or Lighter.
It can also feature Normal, Oblique, or Italic styles. These variations in weight and style can be added individually to the font family group.
If you were to use CSS code, you would typically employ commands like font-face or font-style to achieve the desired result. However, once you’ve uploaded your font variations, you can easily choose the font in Elementor and adjust its weight and style as needed.
It’s important to note that if you skip uploading a specific weight, it won’t be available in the editor. In such cases, supported browsers like Firefox, Safari, Chrome, and others will fallback to the nearest available weight.
So, while you have the option to use default or Google fonts, you can also add a unique touch by incorporating custom fonts. Pick a custom font that sets your work apart and start using it on your WordPress projects with Elementor Pro.
Pro Tips and Best Practices
1. Maintain Font Consistency:
- Limit your font palette: Opt for a cohesive set of 2-3 fonts to avoid a cluttered aesthetic. Consider a primary font for headings, a secondary font for body text, and an accent font for specific elements.
- Apply consistent styles: Set default font sizes, weights, and spacing styles for different elements (headings, paragraphs, buttons) and ensure uniformity across the website.
- Create reusable styles: Utilize Elementor’s global styles feature to define and apply pre-configured font settings to various elements, saving time and maintaining consistency.
2. Align Fonts with Brand Identity:
- Reflect your brand values: Choose fonts that convey the desired emotions and personality of your brand. For example, bold, sans-serif fonts might work well for a tech startup, while elegant, serif fonts could suit a luxury brand.
- Consider your target audience: Choose fonts that resonate with your target demographic and are easy for them to read and understand.
- Maintain brand continuity: If you have established brand guidelines, ensure your chosen fonts align with existing logos, color palettes, and overall brand image.
3. Legal Considerations for Commercial Fonts:
- License matters: Always purchase the appropriate license for any commercial font you use, whether personal, webfont, or desktop license. Free fonts often have specific usage restrictions, so be sure to check the terms before incorporating them.
- Attribution requirements: Some font licenses require attribution in the website footer or copyright section. Comply with those necessities to keep away from criminal issues.
- Stay updated: Font licensing terms and regulations can change over time. Stay informed and adhere to any updates or revisions to your font licenses.
By following these pro tips and best practices, you can ensure that your custom fonts enhance your website’s visual appeal, align with your brand identity, and are used legally and ethically.
Remember, your fonts are a powerful design element, so choose them wisely and leverage them strategically to create a memorable and consistent online presence.
Bonus: Consider including a resource list of websites or tools that provide information on font licensing and usage rights.
Websites Using Custom Fonts Effectively
- Airbnb: Utilizes a custom sans-serif font called “Airbnb Cereal” for a warm and approachable feel, reflecting the community-driven nature of the platform.
- Apple: Employs the clean and minimalist “San Francisco” font family across its websites and products, conveying a sense of modernity and sophistication.
- Netflix: Introduced the custom “Netflix Sans” typeface for a more personalized and brand-specific user experience.
- Patagonia: Uses the rugged and outdoorsy “Patagonia Black” font to align with the brand’s adventurous spirit and environmental focus.
- Squarespace: Leverages a friendly and accessible sans-serif font named “Raleway” to create a welcoming and intuitive user interface for website creation.
Remember, these are just a few examples. Explore and analyze a variety of websites to discover how others are using custom fonts to enhance their brand identity and user experience.
By utilizing these resources and studying successful case studies, you can confidently choose and incorporate custom fonts to elevate your own website’s visual appeal and brand story.
Conclusion:
In conclusion, this guide has provided a comprehensive overview of adding custom fonts to your Elementor-powered WordPress website. We covered various methods, from manual uploads and CSS coding to the simplified process within Elementor itself. Custom fonts offer a unique touch, allowing you to define your website’s style in alignment with your brand.
We explored the significance of font weights and styles, emphasizing their role in creating a cohesive and visually appealing design. Understanding the considerations for font pairing, branding, and legal aspects ensures a professional and ethical use of custom fonts.
The inclusion of Adobe Typekit in Elementor opens up new possibilities, simplifying the integration of professional fonts into web design projects. Whether opting for free alternatives or premium selections, the guide offers insights into where to find diverse fonts and how to experiment with font combinations.
Pro tips and best practices provide practical advice on maintaining font consistency, aligning fonts with brand identity, and addressing legal considerations for commercial fonts.
The conclusion underscores the importance of strategic font choices in creating a memorable and consistent online presence.
In the bonus section, case studies showcased how renowned websites like Airbnb, Apple, Netflix, Patagonia, and Squarespace effectively use custom fonts to enhance their brand identity and user experience.
Recap of Different Methods for Adding Fonts in Elementor:
- Manual Upload and CSS Coding
- Simplified Process within Elementor
- Integration of Adobe Typekit
Resources for Further Learning and Exploration:
- Online Font Platforms: Dafont.com, Myfonts.com, OnlineWebFonts.com, FontShop
- Premium Font Options: Sofia Pro, Proxima Nova, Mont, Futura PT
- Adobe Typekit: For Professional Fonts
- Font Testing Tools: Font Tester, Fonts Ninja, Typetester
- Browser Extensions: WhatFont, Fontface Ninja
- User Testing Platforms: UsabilityHub, UserTesting, UserZoom
- Font Accessibility Tools: WebAIM, WAVE, A11y
- Font Combination Tools: FontPair, Fontjoy, Canva Font Combinations
- Design Inspiration Platforms: Behance, Dribbble, Awwwards
Final Thoughts on Enhancing Your Website with Custom Fonts:
Choosing and incorporating custom fonts is a powerful way to elevate your website’s visual appeal and brand story. By following the outlined methods, considering pro tips, and studying case studies, you can confidently enhance your website’s design, create a lasting impression, and provide a positive user experience.
Experiment, stay informed about industry trends, and let your chosen fonts contribute to the uniqueness of your online presence.
Take advantage of our exclusive reader offer! Secure a lifetime license activation for PowerPack Premium For Elementor for just $6.99. Don’t miss out on this special deal!‘
More Related Articles:
The Biggest Comparison: Elementor Containers vs. Sections?
10 Best Free WordPress Themes with Demo Content for Easy Website Building
Enable Lazy Loading in WordPress using Perfmatters: A Step-by-Step Guide