Dec
Do you want to correctly install and configure the WP Rocket plugin in WordPress?
WP Rocket stands out as a top-notch caching plugin for WordPress. Yet, for those just starting out, figuring out the right settings to boost their website speed can be a bit tricky.
In this guide, we’ll help you effortlessly install and configure WP Rocket in WordPress. We’ll also guide you through each setting, ensuring you harness the full power for optimal performance.
Why Opt for WP Rocket?
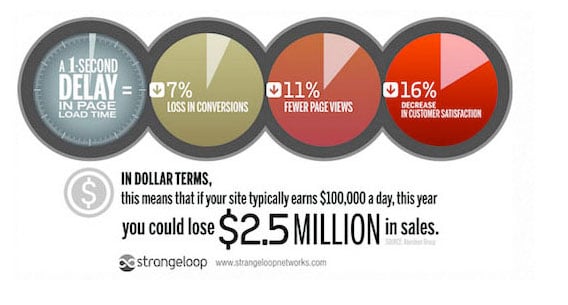
Slow websites are generally disliked. For example, a study on how websites perform revealed that if a page takes an extra second to load, it could lead to 7% fewer people doing what the website wants (like buying something), 11% fewer people looking at different pages, and a 16% drop in how happy visitors are with the website.
It’s not just users who care about website speed; search engines like Google do too. They prefer faster websites and rank them higher in search results.
This is where WP Rocket becomes useful.
It stands out as the top WordPress caching plugin, helping you quickly boost the speed and performance of your WordPress website.
Here’s how it works.
WordPress is a system that manages content dynamically. When someone visits your website, WordPress pulls the content from your database, creates a page on the spot, and then sends it to the visitor.
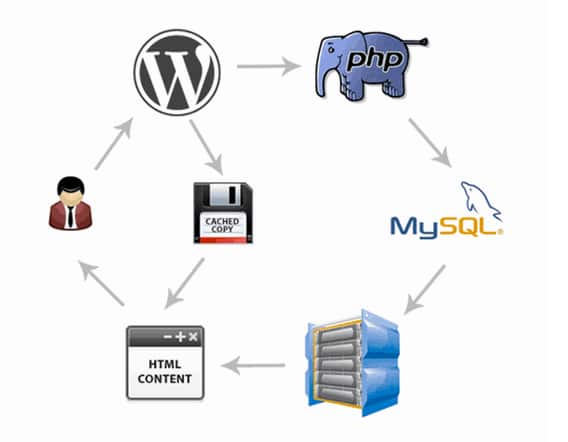
This whole process uses up resources on your WordPress hosting server. If many people visit your site simultaneously, it can slow things down.
WP Rocket simplifies this.
It goes through your pages, creates a static copy, and saves it in the cache. Now, instead of creating a page each time, WordPress can show this cached page to the user.
This eases the load on your server, making your website faster. That’s why we use WP Rocket on many of our websites.
Now, let’s see how to easily put WP Rocket on your WordPress site. In this guide, we’ll cover:
Step 1: Installing WP Rocket Plugin in WordPress
First off, you need to add and activate the WP Rocket plugin.
WP Rocket is a paid plugin, but the good news is we have the best plan for you to start with just $6.99.
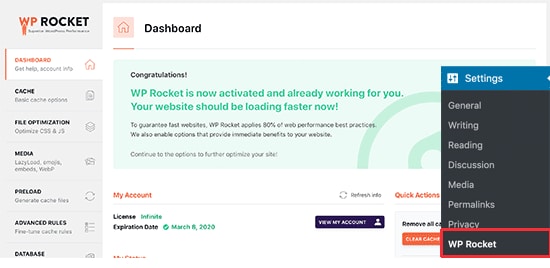
Once you’ve added and activated it, WP Rocket starts working right away. It sets up caching with the best settings for your website.
We tested the speed of our demo site before and after adding WP Rocket. The performance improvement was pretty remarkable with just the default settings.
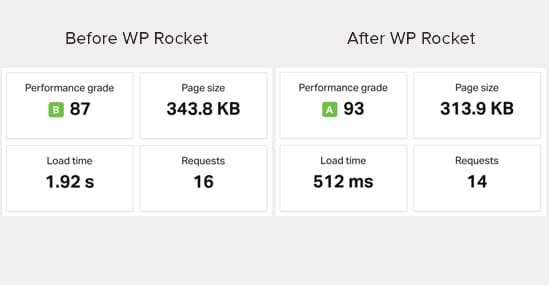
You’ll quickly see the difference in performance because WP Rocket doesn’t sit around waiting for users to ask for pages. It takes the initiative to go through your site, saving pages in the cache before anyone requests them.
To check the caching status, just go to the WP Rocket dashboard. You can find it on the Settings » WP Rocket page.
Now that WP Rocket is up and running, let’s explore its other options and how you can configure them to enhance your website speed.
Step 2: Configuring Cache Settings in WP Rocket
To begin, go to the Settings » WP Rocket page and select the ‘Cache’ tab.
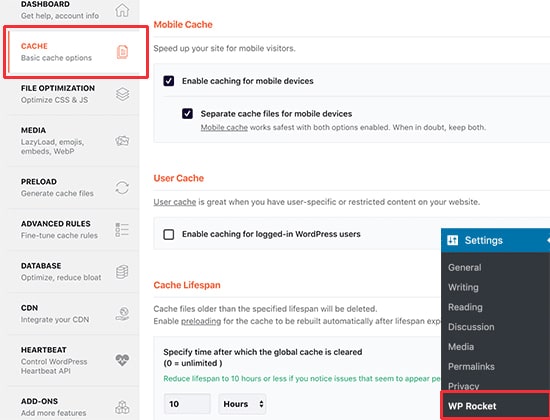
WP Rocket already turns on page caching by default, but you can adjust the settings for better website speed.
Mobile Cache:
Mobile caching is on by default. However, we suggest ticking the ‘Separate cache files for mobile devices’ option. This ensures that mobile users get a fully optimized cached experience.
User Cache:
If your website requires user login for certain features, check this option. For instance, if you run a WooCommerce store or a membership site, enabling ‘User Cache’ enhances the experience for logged-in users.
Cache Lifespan:
Cache lifespan is how long you want to keep cached files on your site. The default is 10 hours, suitable for most sites. Adjust it lower for busy sites or higher for less frequently updated sites. After this time, WP Rocket deletes cached files and starts preloading the cache with new content.
Remember to hit ‘Save Changes’ to apply your settings.
Step 3: Compressing Files with WP Rocket
WP Rocket lets you shrink static files like JavaScript and CSS stylesheets. Just go to the ‘File Optimization’ tab and tick the boxes for the types of files you want to minimize.
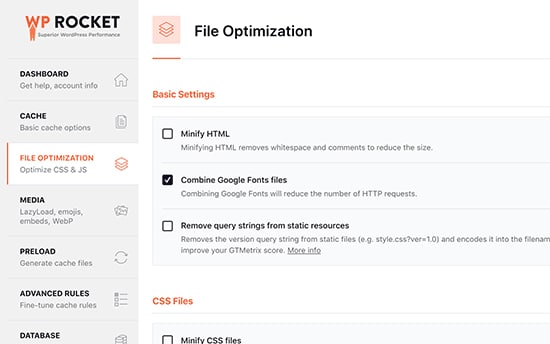
When you minimize static content, you’re essentially making those files smaller. For most websites, this reduction is too minor to noticeably affect performance.
Yet, if your site gets a lot of traffic, it can significantly cut down on overall bandwidth use and hosting costs.
However, a word of caution: Minimizing files can sometimes lead to unexpected issues like files not loading correctly or not working as they should.
If you decide to enable this setting, take the time to thoroughly check your website pages to ensure everything is functioning as intended.
Step 4: Enhancing Page Load Speed with Lazy Load Media in WP Rocket
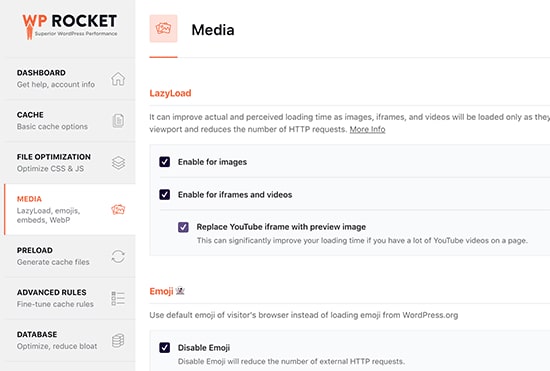
Images are often the second heaviest elements on a page, following videos. Unlike text, images take more time to load, contributing to the overall page size.
Many popular websites now use a trick called lazy loading to delay image downloads. Instead of loading all images at once, lazy loading only downloads the images that will appear on the user’s screen. This not only speeds up page loading but also gives the user a faster experience.
WP Rocket has a built-in lazy loading feature. You can turn on lazy loading for images by going to the ‘Media’ tab in the plugin’s settings. Additionally, you can enable lazy loading for embeds like YouTube videos and iframes.
Important: While lazy loading images can enhance the apparent speed of your website, it’s crucial to save and optimize images specifically for the web to achieve the best results. For more details, refer to our step-by-step guide How to Make Pictures Load Faster on WordPress.
Step 5: Adjusting Preloading Settings in WP Rocket
Now, you can check the preloading settings in WP Rocket by going to the ‘Preload’ tab. By default, the plugin begins scanning your homepage and follows the links it discovers to preload the cache.
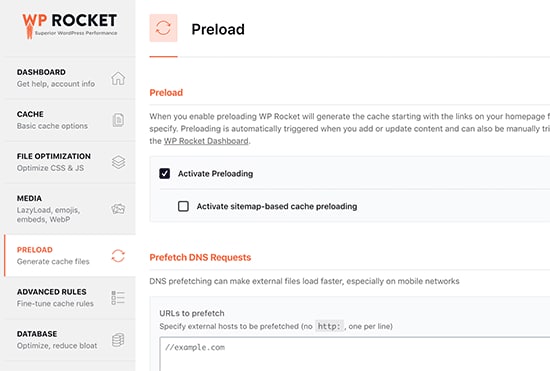
Alternatively, you can instruct the plugin to utilize your XML sitemap for cache building.
While you have the option to disable preloading, we advise against it. Disabling preloading means WordPress will only cache pages when a user requests them. This results in the first user to load a particular page experiencing a slow website.
Editor’s note: We highly recommend keeping preloading activated for optimal performance on your WordPress website.
Step 6: Configuring Advanced Cache Rules in WP Rocket
WP Rocket provides complete control over caching. For instance, you can go to the ‘Advanced Rules’ tab on the settings page to exclude pages that you don’t want to be cached.
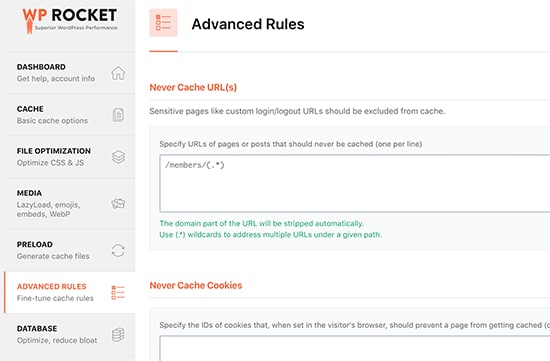
You also have the option to exclude cookies, and user agents (different browsers and device types), and automatically refresh the cache when updating specific pages or posts.
These settings are designed for developers and advanced users with intricate setups requiring customized configurations. If you’re unsure about these options, the default settings are suitable for most websites.
Step 7: Conducting Database Optimization with WP Rocket
WP Rocket simplifies the process of cleaning up the WordPress database. While it has minimal impact on your website’s performance, you can still explore these options if you wish.
Navigate to the ‘Database’ tab on the plugin settings page. Here, you can remove post revisions, drafts, spam, and trash comments.
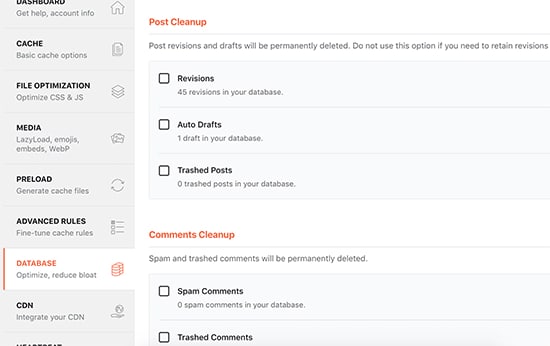
We advise against deleting post revisions since they can be valuable for undoing changes to your WordPress posts and pages later on.
Additionally, there’s no need to delete spam and trashed comments, as WordPress takes care of cleaning them up automatically after 30 days.
Step 8: Integrating Your CDN with WP Rocket Configuration
If you use a CDN service for your WordPress site, you can configure it to work with WP Rocket. To do this, go to the ‘CDN’ tab.
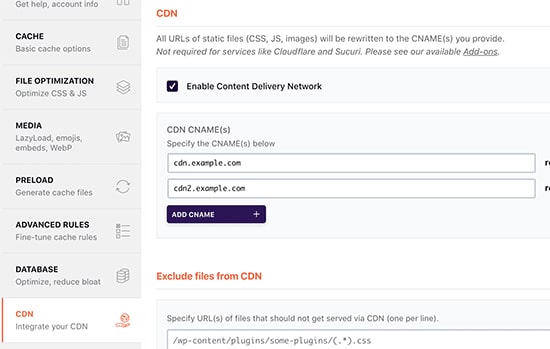
A CDN, or content delivery network, lets you deliver static files from servers spread globally. This speeds up your website by allowing the user’s browser to download files from the nearest server, reducing the load on your hosting server and improving website responsiveness.
We recommend Sucuri. It is one of the best CDN services. Sucuri’s cloud-based firewall gives you a powerful CDN service to serve your static files.
If you’re seeking a free alternative, Cloudflare is a good option. However, note that Cloudflare’s free CDN has limited protection against DDoS attacks and fewer features.
WP Rocket offers separate add-ons to easily set up Sucuri and Cloudflare on your website. More details on this will be discussed later.
Step 9: Minimizing Heartbeat Activity in WordPress Using WP Rocket
The Heartbeat API enables WordPress to send occasional requests to the hosting server in the background. This allows your website to carry out planned tasks.
For instance, when creating blog posts, the editor uses the Heartbeat API to verify connectivity and monitor changes to the post.
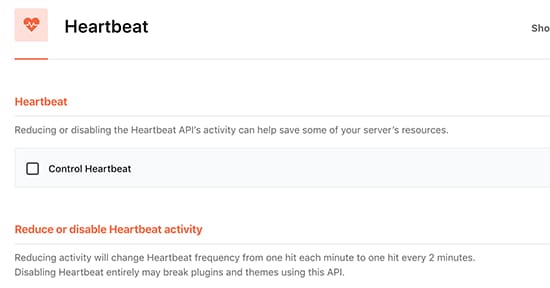
To manage the Heartbeat API feature and lower its frequency, go to the ‘Heartbeat API’ tab in WP Rocket.
While we don’t advise turning off the Heartbeat API entirely because it provides useful features, reducing its frequency can enhance performance, particularly on larger websites.
Step 10: Exploring Additional Features with WP Rocket Add-ons
WP Rocket includes additional features that are ready to use and can be added on easily. Let’s explore the currently available add-ons on this list.
Google Analytics Add-on:
The Google Analytics add-on for WP Rocket allows you to keep the Google Analytics code on your server. While it doesn’t significantly improve performance, some users do this to achieve a 100% page speed score. It works well with popular Google Analytics plugins like MonsterInsights and ExactMetrics.
Facebook Pixel:
If you use the Facebook pixel for user tracking, this add-on hosts the pixels locally on your server. This can improve your page speed score but might not have a noticeable impact on website speed.
Varnish Add-on:
If your WordPress hosting uses the Varnish cache, enable this add-on. It ensures that the Varnish cache is cleared when WP Rocket clears its cache.
Cloudflare:
If you’re using Cloudflare CDN, use this add-on to integrate it with WP Rocket. Just enable the add-on and click on the ‘Modify options’ button.
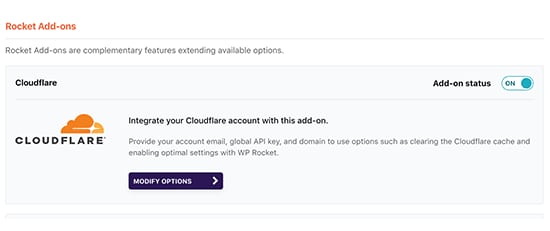
Next, you should input your Cloudflare account details. This step connects WP Rocket to your Cloudflare account.

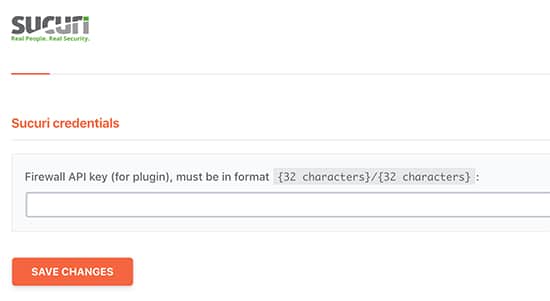
Sucuri:
If you use Sucuri, activate this add-on and click the ‘Modify options’ button. Then, input your Sucuri account’s API key to establish the connection with your account.
Step 11: Handling Your WP Rocket Caching
WP Rocket provides a straightforward way for admins to handle and clear the WordPress cache. Just navigate to the plugin’s settings page, and you’ll see the option to clear the WP Rocket cache on the ‘Dashboard’ tab.
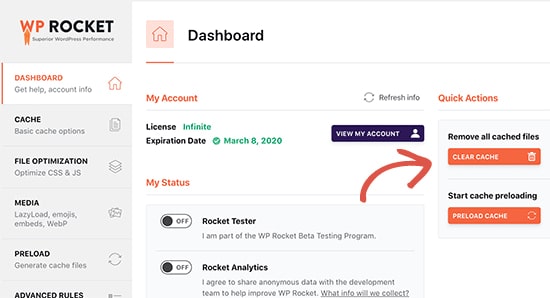
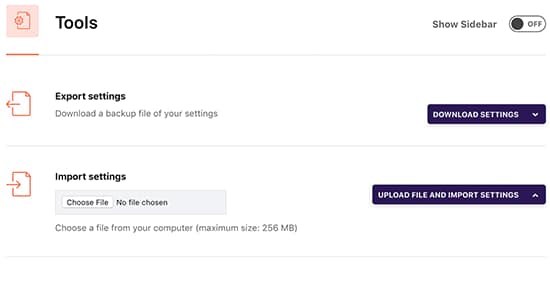
You can initiate a preloading sequence to refresh the cache as needed. The plugin also simplifies the process of importing and exporting plugin settings.
Head to the tools section to smoothly export and import these settings. This proves useful when transferring WordPress from a local server to a live website or moving WordPress to a new domain.
Further down, you’ll discover the option to revert the plugin to a previous version. This is useful if an update to WP Rocket didn’t perform as anticipated.
WP Rocket Frequently Asked Questions (FAQ)
As WP Rocket has gained popularity, we’ve addressed numerous questions about the WordPress caching plugin. Here are some of the top queries:
Is there a free version of WP Rocket?
No, WP Rocket is a premium WordPress caching plugin with no free version or trial. They do provide a 14-day money-back guarantee.
While you might find a free, nulled version of WP Rocket, we strongly discourage using it due to potential security risks.
But we have an offer for our readers. You can Now get WP Rocket at just $6.99.
Is WP Rocket worth the price?
Yes, it’s worth the investment. We, as paying customers, successfully use WP Rocket on various websites, including WPForms and OptinMonster. You might also find our case study on making WordPress faster than static site generators interesting.
Can I use WP Rocket with managed WordPress hosting?
Absolutely. You should use WP Rocket alongside the built-in caching provided by your managed hosting for additional performance benefits.
Many managed WordPress hosting companies, such as WP Engine, SiteGround, and Bluehost, have their own caching plugins integrated.
WP Rocket complements these built-in options, offering extra features like CDN, file minification, lazy loading, smart cache preloading, and more.
How can I check if WP Rocket is working and caching pages?
To verify WP Rocket’s proper functioning, log out of your site or open it in an incognito window. Access the browser’s source view of the page and scroll to the bottom.
If you see the text, “This website is like a rocket …” at the end, WP Rocket is working correctly and caching pages.
What makes WP Rocket better than other caching plugins?
In our view, WP Rocket surpasses other WordPress caching plugins like W3 Total Cache and WP Super Cache due to its extensive feature set and regular updates aligning with modern browser standards. This is the primary reason we’re transitioning all our sites to use WP Rocket.
Related Article: Maximizing Speed: A Guide to WordPress Performance Optimization with WP Rocket
Final Words
In conclusion, mastering the installation and configuration of the WP Rocket plugin can significantly elevate your WordPress website’s speed and overall performance.
WP Rocket, a premier caching plugin, proves its worth by efficiently addressing the critical issue of slow loading times.
In a digital landscape where every second matters, the impact on user engagement, conversions, and search engine rankings cannot be overstated.
By carefully navigating through each step outlined in this guide, you empower your website with the tools needed to thrive in a fast-paced online environment.
Take advantage of WP Rocket’s features, from smart caching to lazy loading, and enjoy a streamlined, faster, and more user-friendly WordPress experience.
Unlock access to all WordPress premium products